I started with cotton T-shirts from Costco and used some Stampin' Up! product somewhere on each of them.
 Ruth's Top
Crumb Cake 127840 and Early Espresso 127839 Scalloped Tulle roses with Vintage Faceted buttons 127555 adorn the left shoulder of Ruth's tea-dyed T-shirt.

Abbey's Top
I cut a new neckline, trimmed it with lace and encased the raw edges with Whisper White 3/8 in. Taffeta ribbon 109070. (See the instructions for Celeste's Top to see how to encase an edge with trim.) Then I added another row of lace attached to the ribbon at intervals and topped it off with a row of narrow lace trim. Abbey's hates beige so I left her top white.

Here's a close-up of the neck.
Grace's Top
I tea-dyed a t-shirt and the sleeves from Celeste's top. (See below) Using the Big Shot 113439 and Fun Flowers die 121812, I cut several flowers from the extra sleeves and from Crumb Cake 127840 and Early Espresso 127839 Scalloped Tulle. Stack a tulle flower on a knit flower and sew 3 pearl beads to the centre on the neckline.
Celeste's Top
After replacing the sleeves with half doilies I tea-dyed it.
Cut off the sleeves from a t-shirt close to the seam and sew the seam allowances inside the armhole.
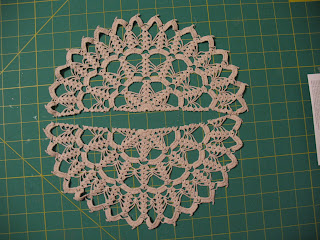
Cut a large doily in half and handle gently.
Measure around the arm and cut a length of 7/8 in. Cotton Ribbon 127844 allowing for movement. (Mine was 13 in.) Hand-baste the cut edge of the doily just below the centre of the ribbon.
Here's a close-up.
Fold the ribbon closed and machine stitch the edges together, encasing the cut edge of the doily. Remove the basting threads. Join the ends of the ribbon, creating the sleevebands.
Measure and mark the armhole at intervals. Pin the points of the doily to the armhole. Sew close to the edge of the armhole catching the doily in the seam.

Cheryl's Top
I made a cardigan from a t-shirt and a dresser cloth doily and tea-dyed it.
Cut a rectangular dresser cloth in half lengthwise. Hand stitch two short ends together to make a long strip.

Cut the t-shirt front up the middle with a v-neckline. Lay flat and measure the cut edge. Cut a length of Victoria Crochet trim 118481 the same measurement plus 1 in.
Hand baste the doily strip to the front and neck edges of the cardigan. (Not shown) Pin the crochet trim to the edge over the doily strip and fold 1/2 in. to the inside at the hem. Machine stitch through all layers 1/4 in. from the edge.

Fold the crochet trim over the seam to the inside. Machine stitch close to the edge.

This is how the right side looks. Tea-dye the cardigan.


5 comments:
These are incredible!!!!!!! You are so talented and ur girls are so lucky. What beautiful creations. Thank you for sharing so many details :)
Beautiful Work! I bet they all loved them too! Gorgeous!
WOW - These are beautiful! Pinned to my sewing board. TFS!
Holly Legare
Spectacular! You are so talented. Lots of details here, thank you so much for sharing :) Erika
This is JUST SICK!!! RIDICULOUS ... Ridiculously good! So good, in fact, that it makes me sick with envy.
All kidding aside, Cheryl, it is GORGEOUS work. Such talent is a gift. Thank you for sharing it with us.
I'm looking forward to our next card class --- no pressure though. Living at the speed of life can be very busy at times.
Sending kind thoughts, Norma xo
Post a Comment