The More Amore Suite of products from the Spring Catty inspired me to make this fabulous gift basket for someone special. The product line includes stamps, tools and embellishments. Even fabric!

So what's inside? Sweet stuff to make a special day. Light the candle and enjoy a soak with cinnamon bath salts while nibbling a few cinnamon hearts. Then go out shopping with the pre-paid VISA card in the fabric shopping tote. Make sure to take some pictures and add them to the mini-album to remember your special day. Use the woven ribbon basket to hold something special.

Hearts a Flutter Candle
I bought a cream coloured 4 in. pillar candle at a Dollar Store and embellished it with stamped tissue paper hearts and rhinestones (119246).
Use images from the Hearts a Flutter stamp set (129249) on tissue paper with Pool Party (126982), Real Red (126949), Primrose Petals (126858) and Basic Black (126980) ink pads.
 -cut out the hearts with scissors - no need to be careful
-use a dab of glue to hold the hearts on the candle
 -wrap the candle with wax paper
-gently heat the wax paper with your heat tool (129053) just until the tissue paper disappears into the candle wax
-DON'T OVERHEAT! If it's dripping or smoking it's too late
-let cool and peel off wax paper
-add basic rhinestones (119246) to the hearts
 Cinnamon Bath Salts
Mix equal parts Epsom Salts and Coarse Sea Salt. Add Cinnamon Essential Oil and pink or red food colouring.
I bought my jar at a Dollar Store and decorated the lid with some buttons, lace trim and paper roses from the Artisan Embellishment Kit (129328)
Cinnamon Hearts
Fill another Dollar Store jar with cinnamon hearts and decorate the lid with some buttons, lace trim and paper roses from the Artisan Embellishment Kit (129328).
Mini Album
The Artisan Embellishment Kit (129328) has a gorgeous assortment of embellishments and trims packaged on a 6 X 9 in. piece of chipboard.
 -cut the chipboard in half to get two 4-1/2 X 6 in. pieces
-cut two pieces of Pool Party Core'dinations card stock (129321) the same size
-emboss the front piece with hearts from the Adorning Accents Folders (125601)
-glue the card stock pieces to the chipboard and sand the card stock surfaces and edges a bit
-score a 6 X 11 piece of Real Red card stock (102482) at 4-1/2 in., 9 in. and 9-1/8 in. from the left on the Simply Scored tool (122334)
-crease score lines like an accordion
-score a 6 X 11 piece of Basic Gray card stock (121044) at 4-1/2 in., 4-5/8in., 9-1/8 in. and 9-1/4 in. and crease accordion style
 -glue the left section of the Real Red card stock to the back of the Pool Party chip board album cover
-glue the left section of the Basic Gray card stock to the right section on the Real Red card stock
-glue a 4-1/2 piece of First Edition SDSP (121878) over the joined colours.
 -glue right section of the Basic Gray card stock to the chip board back cover
-glue a 4-1/2 X 6 in. piece of Primrose Petals card stock (126841)over the join
-glue embellishments from the Artisan Embellishment Kit (129328) to the front cover and album sections after the album in assembled
Woven Ribbon Basket
 I bought this organizer at a Dollar Store and cut off all the webbing strips.
 This is the frame.
 Use an assortment of Stampin' Up! ribbons and sew or glue the edges to the frame.
Weave the ribbons under and over the wire support of the bottom.
After you have the first pair of opposite sides and bottom ribbons attached to the frame, add the other sides while weaving the bottom as you go.
 You could use a glue gun to secure the ribbons over the frame, but I hate burning my fingers, so I sewed mine.

 When the sides have ribbon strips and the bottom is woven, start weaving ribbon through the sides.
I sewed mine together on the right side and coaxed the seam over to hide under a strip on the inside.
I used a glue gun to attach the 5/8 in. Flower Trim (126869) trim over my stitching around the top of the basket.
Stamp the top layer of tissue with hearts, too!
More Amore Fabric Tote
 To make my shopping tote you'll need a package of three fat quarters of More Amore Designer Fabric (129307).
I usually wash and dry my fabric before cutting, especially if I want to launder the finished project.
All seams are a scant 1/4 in. unless otherwise stated.
 Pool Party Doily Print cutting order
-cut the 10-1/2 X 8-1/2 pieces for the bag panels
-cut the 2-1/2 X 14 strips for the facings
-cut the 2-1/2 X 13 strips for the gusset
-save a piece for the hearts
-discard the rest
 Real Red Heart Print cutting order
-cut a 5 X 20 strip across the bottom, then cut into 2-1/2 X 20 strips for the handles
-save the piece for the hearts
-cut the 6 X 14 pieces for the bag panels
-cut the 2-1/2 X 13 strips for the gusset
-discard the rest
 Script Print cutting order
-cut the 6-1/2 X 10-1/2 pieces for the bag panels
-cut the 2-1/2 X 13 strips for the gusset
-cut the 2-1/2 X 20 strips for the handles
-save the piece for the hearts
-discard the rest
 Cotton Lining Fabric 45 in. wide
-cut a 6 in. strip the width of the fabric
-cut two 14 X 16 pieces

-sew the Pool Party Print and Script Print pieces together
-press the seam toward the Pool Party Print

-sew the Real Red Print across the bottom
-press the seam toward the Real Red Print
-baste the Tote panels to the lining fabric

-apply Steam-A-Seam to the reserved fabric pieces
 -cut out two hearts from each fabric with the Hearts Framelits die (125599) and the Big Shot (113439)

-fold the tote panel into quarters and mark the centre
 -position the hearts on the tote panel so that the large white button is positioned over the centre marking
-only sew buttons to one tote panel

-sew the strips for the handles together using a 5/8 in. seam allowance
-press the seams open and turn the handles right side out

-press the handles

-pin the handles to the top of the tote panels about 3-1/2 in. from the side edges and extending 3/4 of an inch beyond the top edge
 -fold the facing in half lengthwise and sew to top edge of tote panel
-fold a 6 in. piece of elastic to form a loop and pin to the middle of the top edge of the tote panel with the buttons

-press the facing down on the inside and sew close to folded edge
-sew a box with an X to secure the handles

-secure the elastic loop with top-stitching
 -sew the Pool Party gusset strips to the Real Real gusset strips
-press the seams down

-sew the Script gusset strips to each gusset unit except one
 -cut the remaining two strip unit into two 6 in. sections

-cut a 6 in. strip from the last Script gusset strip and discard the rest
-sew the strip to one two strip unit

-cut the 13 in. sections into 6 in. wide sections

-sew the sections into a continuous strip being careful to keep the direction of the hearts upright

-baste the lining strip to the gusset strip
-trim the ends of the lining even with the gusset strip

-with wrong sides together, pin the middle of the gusset strip to the middle of the bottom edge of the tote panel
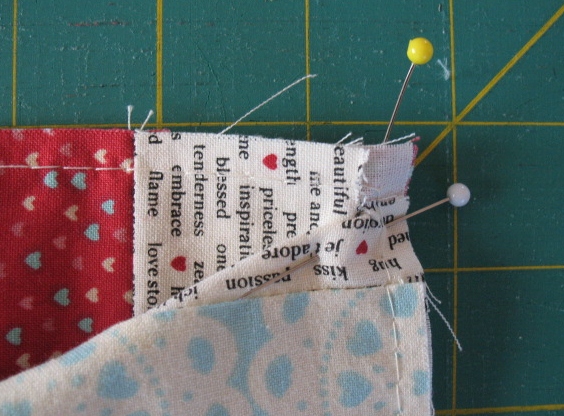
-pin the gusset strip to the corner

-place the pin 3/8 in. from the edges

-turn over and snip the gusset strip to the pin

-spread the snip to turn the corner
-pin the gusset to the sides

-mark the top edge of the tote panel with a pin in the gusset strip

-fold the edge of the gusset strip to the pin
 -fold again and stitch along the folded edge

-press 7/8 in. Cotton Ribbon in half lengthwise
-fold over edge of ribbon and pin even with the top of the tote
-place raw edges of the tote panel and gusset along the fold of the ribbon
-baste from the top to the corner and cut the thread

-form a mitre at the corner and pin to hold in place
 -continue basting to the next corner and repeat
-cut ribbon and fold over the edge at the top of the tote

-fold ribbon over tote and gusset raw edges
-sew from the top stopping before the corner

-form a mitre and secure with a pin
-continue sewing, turning at the corners
 To fold the tote, place it on a flat surface, button side down and put the handles inside.

Fold the sides to the middle and fold into quarters from the bottom up.

Secure the elastic loop over the white button


Hearts a Flutter Candle
I bought a cream coloured 4 in. pillar candle at a Dollar Store and embellished it with stamped tissue paper hearts and rhinestones (119246).
Use images from the Hearts a Flutter stamp set (129249) on tissue paper with Pool Party (126982), Real Red (126949), Primrose Petals (126858) and Basic Black (126980) ink pads.

-use a dab of glue to hold the hearts on the candle

-gently heat the wax paper with your heat tool (129053) just until the tissue paper disappears into the candle wax
-DON'T OVERHEAT! If it's dripping or smoking it's too late
-let cool and peel off wax paper
-add basic rhinestones (119246) to the hearts

Mix equal parts Epsom Salts and Coarse Sea Salt. Add Cinnamon Essential Oil and pink or red food colouring.
I bought my jar at a Dollar Store and decorated the lid with some buttons, lace trim and paper roses from the Artisan Embellishment Kit (129328)
Cinnamon Hearts
Fill another Dollar Store jar with cinnamon hearts and decorate the lid with some buttons, lace trim and paper roses from the Artisan Embellishment Kit (129328).
Mini Album
The Artisan Embellishment Kit (129328) has a gorgeous assortment of embellishments and trims packaged on a 6 X 9 in. piece of chipboard.
 -cut the chipboard in half to get two 4-1/2 X 6 in. pieces
-cut two pieces of Pool Party Core'dinations card stock (129321) the same size
-emboss the front piece with hearts from the Adorning Accents Folders (125601)
-glue the card stock pieces to the chipboard and sand the card stock surfaces and edges a bit
-score a 6 X 11 piece of Real Red card stock (102482) at 4-1/2 in., 9 in. and 9-1/8 in. from the left on the Simply Scored tool (122334)
-crease score lines like an accordion
-score a 6 X 11 piece of Basic Gray card stock (121044) at 4-1/2 in., 4-5/8in., 9-1/8 in. and 9-1/4 in. and crease accordion style

-glue the left section of the Basic Gray card stock to the right section on the Real Red card stock
-glue a 4-1/2 piece of First Edition SDSP (121878) over the joined colours.

-glue a 4-1/2 X 6 in. piece of Primrose Petals card stock (126841)over the join
-glue embellishments from the Artisan Embellishment Kit (129328) to the front cover and album sections after the album in assembled
Woven Ribbon Basket


Weave the ribbons under and over the wire support of the bottom.
After you have the first pair of opposite sides and bottom ribbons attached to the frame, add the other sides while weaving the bottom as you go.


I sewed mine together on the right side and coaxed the seam over to hide under a strip on the inside.
I used a glue gun to attach the 5/8 in. Flower Trim (126869) trim over my stitching around the top of the basket.
Stamp the top layer of tissue with hearts, too!
More Amore Fabric Tote
 To make my shopping tote you'll need a package of three fat quarters of More Amore Designer Fabric (129307).
I usually wash and dry my fabric before cutting, especially if I want to launder the finished project.
All seams are a scant 1/4 in. unless otherwise stated.

-cut the 10-1/2 X 8-1/2 pieces for the bag panels
-cut the 2-1/2 X 14 strips for the facings
-cut the 2-1/2 X 13 strips for the gusset
-save a piece for the hearts
-discard the rest

-cut a 5 X 20 strip across the bottom, then cut into 2-1/2 X 20 strips for the handles
-save the piece for the hearts
-cut the 6 X 14 pieces for the bag panels
-cut the 2-1/2 X 13 strips for the gusset
-discard the rest

-cut the 6-1/2 X 10-1/2 pieces for the bag panels
-cut the 2-1/2 X 13 strips for the gusset
-cut the 2-1/2 X 20 strips for the handles
-save the piece for the hearts
-discard the rest

-cut a 6 in. strip the width of the fabric
-cut two 14 X 16 pieces

-sew the Pool Party Print and Script Print pieces together
-press the seam toward the Pool Party Print

-sew the Real Red Print across the bottom
-press the seam toward the Real Red Print
-baste the Tote panels to the lining fabric

-apply Steam-A-Seam to the reserved fabric pieces
 -cut out two hearts from each fabric with the Hearts Framelits die (125599) and the Big Shot (113439)
-fold the tote panel into quarters and mark the centre
 -position the hearts on the tote panel so that the large white button is positioned over the centre marking
-only sew buttons to one tote panel

-sew the strips for the handles together using a 5/8 in. seam allowance
-press the seams open and turn the handles right side out

-press the handles

-pin the handles to the top of the tote panels about 3-1/2 in. from the side edges and extending 3/4 of an inch beyond the top edge
 -fold the facing in half lengthwise and sew to top edge of tote panel
-fold a 6 in. piece of elastic to form a loop and pin to the middle of the top edge of the tote panel with the buttons

-press the facing down on the inside and sew close to folded edge
-sew a box with an X to secure the handles

-secure the elastic loop with top-stitching
 -sew the Pool Party gusset strips to the Real Real gusset strips
-press the seams down

-sew the Script gusset strips to each gusset unit except one
 -cut the remaining two strip unit into two 6 in. sections
-cut a 6 in. strip from the last Script gusset strip and discard the rest
-sew the strip to one two strip unit

-cut the 13 in. sections into 6 in. wide sections

-sew the sections into a continuous strip being careful to keep the direction of the hearts upright

-baste the lining strip to the gusset strip
-trim the ends of the lining even with the gusset strip

-with wrong sides together, pin the middle of the gusset strip to the middle of the bottom edge of the tote panel
-pin the gusset strip to the corner

-place the pin 3/8 in. from the edges

-turn over and snip the gusset strip to the pin
-spread the snip to turn the corner
-pin the gusset to the sides

-mark the top edge of the tote panel with a pin in the gusset strip

-fold the edge of the gusset strip to the pin
 -fold again and stitch along the folded edge
-press 7/8 in. Cotton Ribbon in half lengthwise
-fold over edge of ribbon and pin even with the top of the tote
-place raw edges of the tote panel and gusset along the fold of the ribbon
-baste from the top to the corner and cut the thread

-form a mitre at the corner and pin to hold in place
 -continue basting to the next corner and repeat
-cut ribbon and fold over the edge at the top of the tote

-fold ribbon over tote and gusset raw edges
-sew from the top stopping before the corner

-form a mitre and secure with a pin
-continue sewing, turning at the corners
 To fold the tote, place it on a flat surface, button side down and put the handles inside.
Fold the sides to the middle and fold into quarters from the bottom up.

Secure the elastic loop over the white button