Friday, December 30, 2011

Ink Techniques: Staining

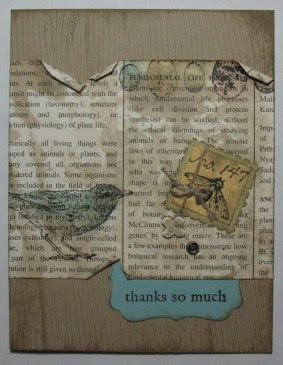
This technique makes the Specialty Designer Paper on this card look like it's stained and old; perfect for a vintage look.

I stamped images on the stained paper and used sponge daubers to colour them. Sponge the edges, too.

The card front was stamped and swiped with an ink pad.


Instructions

-cut off the sealed bottom and side of a page protector to make a plastic folder, or buy one at an office supply store


-open the folder and add dots of ink, then spritz with water


-close the folder to smear the ink between the plastic pages
-open the folder and place 2 pieces of card stock or paper on the bottom page, then close the folder
-press the ink onto the papers and remove them from the folder
-let dry completely
-the paper will be more fragile and easy to distress


Supplies
Stamps
-Nature Walk 121`925
-Three Little Words 113254
-Woodgrain 117100
Ink
-Crumb Cake ink pad 121030
-Crumb Cake ink refill 121029
-Basic Black ink pad 101179
-Baja Breeze ink pad 111833
-So Saffron ink pad 105213
-River Rock ink pad 109010
-Blushing Bride ink pad 119786
Paper
-First Edition SDSP 121878
-Crumb Cake card stock 120953
-Baja Breeze card stock 111352
-River Rock card stock 108640
-So Saffron card stock 105118
Tools
-Decorative Label punch 120907
-Postage Stamp punch 122344
-Sponge Daubers 102892
Accessories
-Bitty Buttons 118761
-Vintage Trinkets 118764
-Linen Thread 104199

Friday, December 23, 2011

Wreath Table Quilt


Instructions


I used 8 yarn-dyed plaids and 12 Stampin' Up! fabrics to make this quilt. Cut a 2-1/2 X 24 in. strip from each fabric. Then cut the strips into (4) 2-1/2 X 6 in. sections.
This is a "scrappy" quilt so don't worry about which fabrics to place together. Just randomly choose strips and sew them together with a scant 1/4 in. seam allowance to make 8 sets of 3 strips, 8 sets of 4 strips and 4 sets of 5 strips. (You'll have some strips left over)


 Press seam allowances as shown for the different sets.


Position top edge of section on a line of the cutting mat and trim the side.


 Move ruler over and cut a 2-1/2 in. strip of blocks.
Move ruler over and cut another 2-1/2 in. strip of blocks. Continue to cut strips from all the sewn sections.


Cut (2) 2-1/2 in. strips across the width of background fabric. I used unbleached cotton.
Then cut the strips into (8) 4-1/2 in. sections and (8) 2-1/2 in. sections.
Sew a 4-1/2 in. section to 8 sets of 3 fabric strips and sew a 2-1/2 in. section to 8 sets of 4 fabric strips.
Press the strips as shown.


Arrange the strips to make 4 blocks, switching them until you like the arrangement.
Sew the strips together into 4 blocks. Then trim the blocks to 10-1/2 in. and sew the blocks together.
Cut (4) 3-1/2 in. wide strips from background fabric. Sew a strip to the top and another strip to the bottom and trim ends. Then sew a strip to each side and trim the ends. Press the seams toward the background fabric.
Layer backing fabric, batting and the quilt top. Pin and quilt diagonally. I used brown thread. Trim edges.


Sew remaining strips of fabric squares into a length of at least 52 squares. There will be some left over.
Press seams open then fold in half and press.
Sew binding to edges of quilt using a 3/8 in. seam allowance making miters at the corners.
Sew binding to back of quilt by hand.
Sew sets of 3 button "berries" to quilt.
Wash and dry your quilt.

Supplies
Beau Chateau Designer Fabric 122336
Candy Cane Christmas Designer Fabric 121715
Deck the Halls Designer Fabric 121716
Holly Berry Bouquet Designer Fabric 124065
Brights Buttons 119747 (Real Red, Daffodil Delight)
Subtles Buttons 119745 (Certainly Celery, Marina Mist)
Regals Buttons 119744 (Riding Hood Red, Cherry Cobbler, Garden Green)
Neutrals Buttons 119743 (Early Espresso, Very Vanilla)

Thursday, December 22, 2011

Brown Bag Spa Gift

Handmade Soap and Bath Salts are always a welcome gift! Try my recipes for All Vegetable Soap and Vanilla Bath Salts. Don't forget to order the Holly Berry Bouquet paper before the Holiday Mini Cataloque ends on Jan. 3rd!


All Vegetable Soap
250 g. lye
650 ml. Water
Measure the water into a pitcher and add the lye to the water. It will get hot and the fumes are bad for you, so cover it and set it outside until the exothermal reaction stops. It will need to cool, too.

90 g. Castor Oil
450 g. Coconut Oil
810 g. Olive Oil
450 g. Palm Oil

Weigh the oils and melt on low heat just until liquid. Overheating can damage the oils!
When the oils and the lye solution each reach a temperature of about 110 to 120 degrees, begin mixing the oils with a stick blender and very slowly pour in the lye solution in a thin stream. Don't rush this part.

Keep mixing the soap to reach the trace stage. It will look like pudding and pile up a bit when you lift the mixer, leaving a trace.
Pour the soap into your form. I used a Pyrex baking dish and lined the bottom with parchment paper. Place it in a box and wrap a blanket around it. Leave it for a couple of days to cool and set up very slowly.

I place my pan in the freezer overnight and thaw it the next day. It falls out of the pan when I invert it over some parchment paper on the counter.

Cut the soap slab into bars and cure for about 3 weeks. Wrap them and add them to the gift bag.

Bath Salts
1 part Sea Salt
2 parts Epsom Salt
Mix together and add essential oils. I used Vanilla Absolute. Heavenly!

Supplies
Stamps
-Lovely As A Tree
-Winter Post
Ink
-Chocolate Chip ink pad
-Chocolate Chip marker
-Garden Green marker
Paper
-Holly Berry Bouquet DSP
-Real Red card stock
-Whisper White card stock
Tools
-1 in. circle punch
-1/14 in. circle punch
-Decorative Label punch
-Wide Oval punch
Accessories
-Real Red Satin ribbon
-Cherry Cobbler/White Baker's twine
-Brown Bag
-Small Jar

Tuesday, December 20, 2011

Chocolate Gingerbread Cookies

Who can resist a gift of cookies?! Try my Chocolate Gingerbread Recipe with the Stampin' Up! cookie press. Then, fill a bag and give them in a decorated box.


Chocolate Gingerbread Recipe
1 cup butter
2 cups light brown sugar
1 tsp. each cinnamon & ground ginger
1/2 tsp. each allspice & salt
1/4 tsp. ground cloves
1/2 cup cocoa powder
1 tsp. baking soda
1/2 cup boiling water
1/2 cup fancy molasses
4 1/2 cups flour
Cream butter and sugar. Mix in all spices, salt and baking soda. Mix in cocoa, water and molasses. Gradually stir in 3 1/2 cups flour, 1/2 cup at a time. Continue adding flour 1/4 cup at a time until dough is stiff. Roll dough onto floured board and cut with cookie cutters or roll into balls and stamp with cookie press. Bake in 300 degrees F. oven for 10-15 mins. You can keep the wrapped dough in the fridge for 2 weeks.


Pleated Paper Lolli
Frostwood Lodge DSP 1 X 12
-score every 1/4 in. with the Stampin' Score tool
-accordion fold the strip and glue the ends together
-cut a card stock doily from Perfect Pennants die with the Big Shot-squeeze hot glue onto the card stock and press the pleated paper down to form the lolli
-hold until the glue cools
-use hot glue to adhere a punched glimmer doily to the top of the lolli
-adhere a Basic Rhinestone jewel to the centre and decorate your box


Supplies
Stamps
-Bright Hopes set 122690
Ink
-Cherry Cobbler ink pad 119669
Paper
-Frostwood Lodge DSP 124002
-Marina Mist card stock 119682
-Silver Glimmer paper 124005
Tools
-Big Shot 113439
-Perfect Pennants die123126
-Doily Triple Layer die 122465
-Simply Scored tool 122334
Accessories
-Basic Rhinestones 119246
-Kraft Gift Box 124106
-Sweet Pressed Cookie Stamps 125152

Monday, December 19, 2011

Hug in a Mug

Perfect to make for a quick and easy gift! After you decorate the mugs with Decor Elements fill them with hot chocolate mix and a candy stir stick.


Instructions
-use the Big Shot with the Stocking Accents die to cut Old Olive and Real Red Decor Elements sheets
-use Snail to adhere the leaves and berries to scrap paper
 -cut a piece of transfer paper and cover your image with the sticky side
 -peel back the transfer sheet, leaving the backing from the vinyls stuck to the scrap paper
 -position the image on the mug and burnish with the applicator or a bone folder
-peel off the transfer paper


Supplies
-Big Shot 113439
-Stocking Accents die 124098
-Old Olive Decor Elements sheets 118803
-Real Red Decor Elements sheets 118802

Sunday, December 18, 2011

The Village of Frostiness

Make this adorable decoration for the holidays! Sprinkle yours with Mica Flakes from the Holiday Mini Catalogue for a snowy scene.


Instructions

 Cut 2 X 4 into 3 lengths: 6-1/4 in., 8 in. & 9-1/2 in. Don't worry about knots and small imperfections.
I used my Radial Arm Saw and shaved off the sides a bit to neaten them.
Measure and mark the pieces as shown with a pencil and cut on the lines for the houses.
Sand to smooth and remove pencil marks.
 Paint the houses with craft paint. I tried to match Real Red, Marina Mist and Chocolate Chip. Wipe with a damp cloth to allow the grain to show.


Red House
Roof

 Whisper White card stock 2 X 5-1/4
-score across width at 2-5/8
-score lengthwise at 1-5/8, punch edge and trim overlap
Letters To Santa DSP 1-5/8 X 5-1/4
-score across width at 2-5/8

 -glue card stock to house even with back
-glue overlap
-glue DSP roof to card stock


Chimney
 Early Espresso card stock 2 X 3-3/8
-score lengthwise every 1/4 in.

 -turn and score every 3/4 in.
-score brick pattern
 -slash from bottom as shown, fold on score lines and cut away tab section
-position in Stampin' Score and score diagonally as shown
 -trim as shown
 -glue tab section under opposite side to form box shape
 -apply glue to remaining tabs and adhere to flap
 -allow to dry
 -glue chimney to roof, even with back


Window
 Whisper White card stock
-use Big Shot and Perfect Pennants die to cut doily
-cut away section below 8 scallops
Letters to Santa DSP
-cut with 1-3/4 in. circle punch and cut away 3/4 in. section keeping stripes vertical
-adhere to card stock and glue 1/8 in. strips to window


Door
 Old Olive card stock 2-1/2 X 3-1/2
-stamp Woodgrain with Early Espresso ink
-adhere 3-8 in. strips of Whisper White card stock to top and sides
-pierce hole for brad
-insert Red Rhinestone brad through small Filigree brad circle and secure to door


-glue door and window to house
-make wreath from plastic garland and glue to door
-make a bow from ribbon and adhere to wreath (see main photo)
Blue House
Roof
Whisper White card stock 2-1/4X 5-3/4
-punch edge with Scallop Edge punch
-cut off tips of scallops with personal cutter

 -score 2-1/4 in. from both sides
-score lenghtwise 1-5/8 in. from straight edge
 -position on house and mark overlap of peaks
 -cut away overlaps of centre section
 -glue card stock to house
Letters to Santa DSP 1-5/8 X 5-3/4
-glue to roof


Door
 Riding Hood Red card stock 5/8 X 5-1/4 & 2-5/8 X 3-3/4
-cut (4) 5/8 in. squares and (2) 5/8 X 1-3/8 rectangles from strip
-score 1/8 in. from edges
-glue door panels to door
-pierce hole and insert Antique brad


Window
 Whisper White card stock
-punch 3/4 in. hole
-position 1-3/8 in circle over hole and punch
-cut 3/8 in. strip from card stock
-on wrong side, mark every 1/2 in.
-turn and mark 1/8 in., then every 1/4 in.
-cut from marks across strip to make window trim sections and glue 4 pieces to circle window frame


 Letters to Santa DSP
-punch 1-1/4 in. circle and adhere under window frame
-glue window and door to house
-make a swag from plastic garland
-thread 3 mini jingle bells onto Cherry Cobbler/White Baker's twine and wrap around swag
-glue swag above door trim (see main photo)


Brown House
Roof
 Old Olive card stock (5) 1 X 12 strips and (15) 1 in. circles
-cut strips with Big Shot and Tasteful Trim die
-glue to front and sides of roof
-trim corners
 -fold circles in half and glue over corner edges on sides and peak of roof


Door
 Chocolate Chip card stock 2-5/8 X 3-5/8
-use Big Shot and Stripes embossing folder
-glue 3/8 in. strips of Whisper White card stock to top and sides
-pierce hole and insert Antique brad


Window
 Letters to Santa DSP 1-1/2 X 1-5/8
-glue 1/8 in. strips of Whisper White card stock across paper to make window panes
-glue 1/4 in. strips of Whisper White card stock to sides


 Whisper White card stock & Letters to Santa DSP 2-3/8 X 3-3/8
-adhere paper to card stock


 -punch 1 long edge with Scallop Edge punch, starting and ending with a full scallop
 -score lengthwise at 1/2, 3/4, 1-1/4 and 1-3/4
 -turn and score both sides from between 2nd from end scallops to top
(you'll have to move the paper/card stock along the top guide since the scallops don't fall exactly on 1/8 in. spacing)
 -cut away side sections from 2 score lines above scallop edge, then cut an angle as shown
-score diagonally from corner of cut away area to between first scallop on both sides
-cut away angled section leaving a tab
 -fold on score lines and glue top section to back of awning forming a wedge
 -trim away end scallop and glue tabs to back of awning
 -glue awning to house just below shingles
-glue window under awning
-glue door to house
-thread 2 bells onto Rose Red seam binding and tie a bow
-glue to door (see main photo)


Snowman

-paint glue over 1 in. and 1-1/2 in. styrofoam balls
(I used my piercing tool to hold them)


-pour Dazzling Diamonds glitter over glue
-roll in glitter and let dry
-glue balls together
-glue bottom to a 3/4 in. circle of white card stock for stand
-insert twig arms, brad eyes and twisted orange card stock carrot nose
-tie Baja Breeze seam binding scarf around neck


Potted Tree (not shown in main photo
 -trim Evergreen garland strip
 -coil into tree shape


-colour Basic Rhinestones with permanent Sharpie markers and adhere to tree
-use hot glue to hold tree in tiny plant pot


Supplies
Stamps
Woodgrain stamp 117100
Ink
-Early Espresso ink pad 119670
Paper
-Letters to Santa DSP 122349
-Whisper White card stock 100730
-Old Olive card stock 100702
-Riding Hood Red card stock 111348
-Chocolate Chip card stock 102128
-Early Espresso card stock 119686
Tools
-Simply Scored Tool 122334
-Personal Cutter 104152
-Big Shot 113439
-Stripes embossing folder 123128
-Tasteful Trim die 120893
-Perfect Pennants die 123126
-3/4 in. circle punch 119873
-1 in. circle punch 119868
-1-1/4 in. circle punch 119861
-1-3/8 in. circle punch 119860
-1-3/4 in. circle punch 119850
-Scallop Trim Border punch 118402
-Scallop Edge Border punch 119882
-piercing tool 116631
Accessories
-Antique brads 117273
-Neutrals brads 119736
-Circle Fire Rhinestone brads 109110
-Filigree brads 112577
-Baja Breeze seam binding 122331
-Rose Red seam binding 121884
-Cherry Cobbler/White Baker's twine 123125
-Mini Jingle Bells 124116
-Riding Hood Red Taffeta ribbon 122988
-Dazzling Diamonds glitter 102023
-Tombow glue 110755
-Mica Flakes 124115