The dreamy translucent quality of vellum is especially lovely for wedding themes. Just choose a font (I used Coronet) and print a title on a vellum mat then lay it over a photo. Great for invitations, too! Make sure your vellum is compatible with your printer.
I punched 1/8 in. holes through the vellum and photo and secured them together with ribbon.
The heart embellishment is punched from stamped vellum and the pearl and rhinestone border hides the adhesive.
Supplies
Stamps
-Lovely Letters 115030 IBC p. 160
-Thoughts and Prayers 113252 IBC p. 150
Ink IBC pp. 165-169
-Basic Black pad
-Whisper White pad
Paper IBC pp. 165-170
-Pink Pirouette Designer Series Paper/Subtles Stack
-Whisper White Designer Series Paper/Neutrals Stack
-Basic Black Designer Series Paper/Neutrals Stack
-Whisper White card stock
-Basic Black card stock
-Whisper White textured card stock
-Pink Pirouette textured card stock
-Basic Black textured card stock
-Vellum paper
-Vellum card stock
Tools
-Scallop Trim border punch 118402 IBC p. 201
-Designer Label punch 120907 HMC p. 25
-1/8 in. punch
-Full Heart punch 119883 IBC p. 203
Accessories
-Pretty in Pink 1/8 in. Taffeta ribbon 119260 IBC p. 191
-Pretty in Pink 3/8 in. Taffeta ribbon 109067 IBC p. 191
-Basic Rhinestones 119246 IBC p. 188
-Basic Pearls 119247 IBC p. 188
Shop Now!
Showing posts with label vellum. Show all posts
Friday, October 29, 2010
Tuesday, September 21, 2010
Vellum Techniques #9
Lovely vellum embellishments are easily made with the Big Shot die cutting system or punches.

The vellum leaf spray on this card was cut out using the Big Shot and the Little Leaves Sizzlits die, then stamped. It is held in place with a brad.
I embossed Designer Series Paper with the Big Shot and the Manhattan Flower embossing folder, then sanded the raised image and trimmed the top following the outline of the flowers.
Supplies
Stamps
-Sincere Salutations 115068 IBC p. 155
-Dot, Dot, Dot 115332 IBC p. 140
Ink IBC pp. 165-169
-Not Quite Navy pad
Paper IBC pp. 165-170
-Baja Breeze card stock
-Not Quite Navy card stock
-Vellum card stock
-Subtles DSP Stack 117152 IBC p. 175
Tools
-Big Shot 113439 IBC p. 204
-Little Leaves Sizzlits die 114511 IBC p. 210
-Manhattan Flower embossing folder 114517 IBC p. 214
-Sanding Blocks 103301 IBC p. 198
Accessories
-Organza Ribbon 114319 IBC p. 190
-Clear Rhinestone brads 113144 IBC p. 187
The Beautiful Butterflies Bigz die was used with the Big Shot to cut the butterfly from both vellum and Designer Series paper and layered together.
Use glue dots under the ribbon holding the butterfly layers together.
Supplies
Stamps
-Great Friend 113792 IBC p. 122
Ink IBC pp. 165-169
-Old Olive pad
-Pretty in Pink pad
Paper IBC pp. 165-170
-Certainly Celery card stock
-Whisper White card stock
-Old Olive card stock
-Vellum card stock
-Subtles DSP Stack 117152 IBC p. 175
Tools
-Big Shot 113439 IBC p. 204
-Beautiful Butterflies Bigz die 114507 IBC p. 206
-Matchbox Bigz XL die 114890 IBC p. 208
-Eyelet Border punch 119853 IBC p. 201
-Decorative Label punch 120907 HMC p. 25
Accessories
-Old Olive 1/8 in. taffeta ribbon 119256 IBC p. 191
-Subtles Flower brads 119732 IBC p. 187
Cut and score vellum card stock at the same time with the Big Shot and the Scallop Envelope Bigz die to make the focal element of a card.
On the back of the envelope hide the adhesive under the punched shapes and the little card.
Supplies
Stamps
-Punch Potpourri Hostess set 118394 IBC p. 10
-Thank You Kindly 111700 IBC p. 158
Ink IBC pp. 165-169
-Chocolate Chip pad
Paper IBC pp. 165-170
-Baja Breeze card stock
-Chocolate Chip card stock
-Naturals White card stock
-Blushing Bride card stock
-So Saffron card stock
-River Rock card stock
-Vellum card stock
Tools
-Big Shot 113439 IBC p. 204
-Elegant Lines embossing folder 119277 IBC p. 214
-Vintage Wallpaper embossing folder 120175 IBC p. 214
-
Scallop Envelope Bigz die 113462 IBC p. 206
-Boho Blossoms punch 119858 IBC p. 200
-Two-step Bird punch 117191 IBC p. 202
-Full Heart punch 119883 IBC p. 203
-sponge dauber 102892 IBC p. 195
Accessories
-Basic Pearls 119247 IBC p. 188
-Very Vanilla 3/8 in. taffeta ribbon 109701 IBC p. 191
-Early Espresso 1/8 in. taffeta ribbon 119959 IBC p. 191
On a Scrapbook page, use the envelope to hold a keepsake pertaining to the photos. Maybe some pressed flowers from a special walk, a ribbon from a gift, or ticket stubs.

Supplies
Stamps
-Punch Potpourri Hostess set 118394 IBC p. 10
-Baroque Motifs 113490 IBC p. 132
Ink IBC pp. 165-169
-Chocolate Chip pad
Paper IBC pp. 165-170
-Baja Breeze card stock
-Chocolate Chip card stock
-Blushing Bride card stock
-So Saffron card stock
-River Rock card stock
-Vellum card stock
-Naturals White card stock
-So Saffron textured card stock
-Subtles DSP Stack 117152 IBC p. 175
Tools
-Big Shot 113439 IBC p. 204
-Vintage Wallpaper embossing folder 120175 IBC p. 214
-
Scallop Envelope Bigz die 113462 IBC p. 206
-Boho Blossoms punch 119858 IBC p. 200
-Two-step Bird punch 117191 IBC p. 202
-Full Heart punch 119883 IBC p. 203
-sponge dauber 102892 IBC p. 195
-Scallop Edge Border punch 119882 IBC p. 200
Accessories
-Basic Pearls 119247 IBC p. 188
-Very Vanilla 3/8 in. taffeta ribbon 109701 IBC p. 191
-Early Espresso 1/8 in. taffeta ribbon 119959 IBC p. 191
Sunday, September 12, 2010
Vellum Techniques #8
Regular weight vellum is thinner than card stock vellum allowing the colouring on the back of an image to be more vibrant.
I stamped the image on the front of regular vellum and let it dry. Then, I used a blender pen and inks on the wrong side to colour the image.
To hide the adhesive I cut the vellum 1 in. longer than the vanilla card stock and scored 1/2 in. from the top and bottom edges to make tab sections. Apply adhesive to the tabs and fold behind the card stock mat.
You can also make photo corners from a triangle of Designer Series Paper to hold vellum in place.
Supplies
Stamps
-Happiness Shared 117038 IBC p. 100
Ink IBC pp. 165-169
-Chocolate Chip pad
-Pink Pirouette pad
-Pretty in Pink pad
-Rose Red pad
-Certainly Celery pad
-Old Olive pad
Paper IBC pp. 165-170
-Pink Pirouette card stock
-Certainly Celery card stock
-Old Olive card stock
-Very Vanilla card stock
-Vellum
-Subtles Designer Series Paper stack
Tools
-Scallop Trim Border punch 118402 IBC p. 201
-Mat Pack 105826 IBC p. 198
Accessories
-1 1/4 in. Old Olive Striped ribbon 115618 IBC p. 191
-Basic Pearls 119247 IBC p. 188
Sunday, September 5, 2010
Vellum Techniques #7
After stamping the vellum, let the ink dry, then turn it over onto a mat and rub the back with waxed paper. Since vellum is translucent, you don't need a light table. Start embossing with the small end of your stylus and go over the area again with the large end. Be gentle and patient or you'll pierce the vellum. (If you like, you can colour the image on the right side)
Instead of adhesive, I sewed the vellum and ribbon to the card stock mat.
I glued card stock to the back of the clear heart button. After trimming, sand the edges and pierce the holes.
Supplies
Stamps
-Friends 24-7 113218 IBC p. 138
-Three Little Words 113254 IBC p. 151
-Teahouse 117132 IBC p. 141
Ink IBC pp. 165-169
-Early Espresso pad
Paper IBC pp. 165-170
-Card Stock vellum
-Baja Breeze card stock
-Crumb Cake card stock
-Early Espresso card stock
Tools
-embossing stylus 100663 IBC p. 196
-Scallop Trim border punch 118402 IBC p. 201
-Sanding Block 103301 IBC p. 198
-Mat Pack 105826 IBC p. 198
Accessories
-Early Espresso taffeta ribbon 119964 IBC p. 191
-Neutrals Designer Buttons 119743 IBC p. 186
-Bitty Buttons 118761 IBC p. 186
-glue dots 103683 IBC p. 197
Sunday, August 29, 2010
Vellum Techniques #6
The lemonade card is my version of many others I've seen. The vase card is my own variation on this technique.
For either card, cut the base of the 3D element from white card stock. Add 1 1/8 in. to the width and cut the vellum. Score 1/2 in. on each side for tabs to adhere to the back of the card stock base.
Mask the top and sponge ink on the wrong side of the vellum. The lemonade is Daffodil Delight ink and the water in the vase is Bashful Blue ink.
Adhere the lemon slices or the bouquet stems to the card stock base and then adhere the vellum tabs to the back and mount the element to the card front.
You can find details for vellum flowers in my previous post.
Supplies
Lemonade Card
Stamps
-Tart and Tangy set 111514 IBC p. 136
-Petal Pizzazz set 113417 IBC p. 102
-Elements of Style set 118611 IBC p. 133
Paper IBC pp. 165-170
-Whisper White card stock
-Melon Mambo card stock
-Pacific Point card stock
-Vellum card stock
Ink IBC pp. 165-169
-Melon Mambo pad
-Tempting Turquoise pad
-Daffodil Delight pad
-sponge daubers 102892 IBC p. 195
-drinking straw
Vase Card
Stamps
-Just Believe set 116948 IBC p. 109
Paper IBC pp. 165-170
-Daffodil Delight card stock
-Baja Breeze card stock
-Marina Mist card stock
-Whisper White card stock
-Vellum card stock
-Marina Mist Paper 117155
Ink IBC pp. 165-169
-Daffodil Delight pad
-Certainly Celery pad
-Marina Mist pad
Accessories
-Big Shot 113439 IBC p. 204
-Daisies die 114520 IBC p. 207
-Boho Blossoms punch 119858 IBC p. 201
-Scallop Edge punch 119882 IBC. p. 201
-sponge dauber 102892 IBC p. 195
-5/16 in. jumbo brads 112534 IBC p. 187
-Daffodil Delight 1/8 in. taffeta ribbon 119254 IBC p. 191
Sunday, August 22, 2010
Vellum Techniques #5
Vellum almost begs to be made into flowers and it couldn't be easier with the Big Shot die cutting system.
I cut 4 medium and 2 small flowers from the Daisies die with my Big Shot. The petals were curled with a bone folder by scraping the edge the length of the vellum. Curl the medium petals under and the small ones up.
The hole in the middle of the daisy is really big, so I layered and adhered them to a circle of white card stock and used a 5/8 in. brad to secure them.
I stamped the sentiment on vellum with a Chocolate Chip Craft pad because it makes a more opaque impression which covers the image beneath better than ink. It takes longer to dry, so be patient. There is adhesive under the first word covered by a card stock cut out. I also used adhesive in the corner covered by the daisy. And, the wrapped linen thread holds the vellum to the mat at the bottom.
Supplies
Stamps
-All a Flutter 118184 SMC p. 31
-Full of Life 111500 IBC p. 152
Ink IBC pp. 165-169
-Chocolate Chip Craft pad
-Chocolate Chip ink pad
Paper IBC pp. 165-170
-Vellum card stock
-Chocolate Chip
-Whisper White
-So Saffron
Tools
-Big Shot 113439 IBC p. 204
-Daisies die 114520 IBC p. 207
-bone folder 102300 IBC p. 198
Accessories
-Linen thread 104199 IBC p. 190
-5/8 in. Neutrals Jumbo brads 112533 IBC p. 187
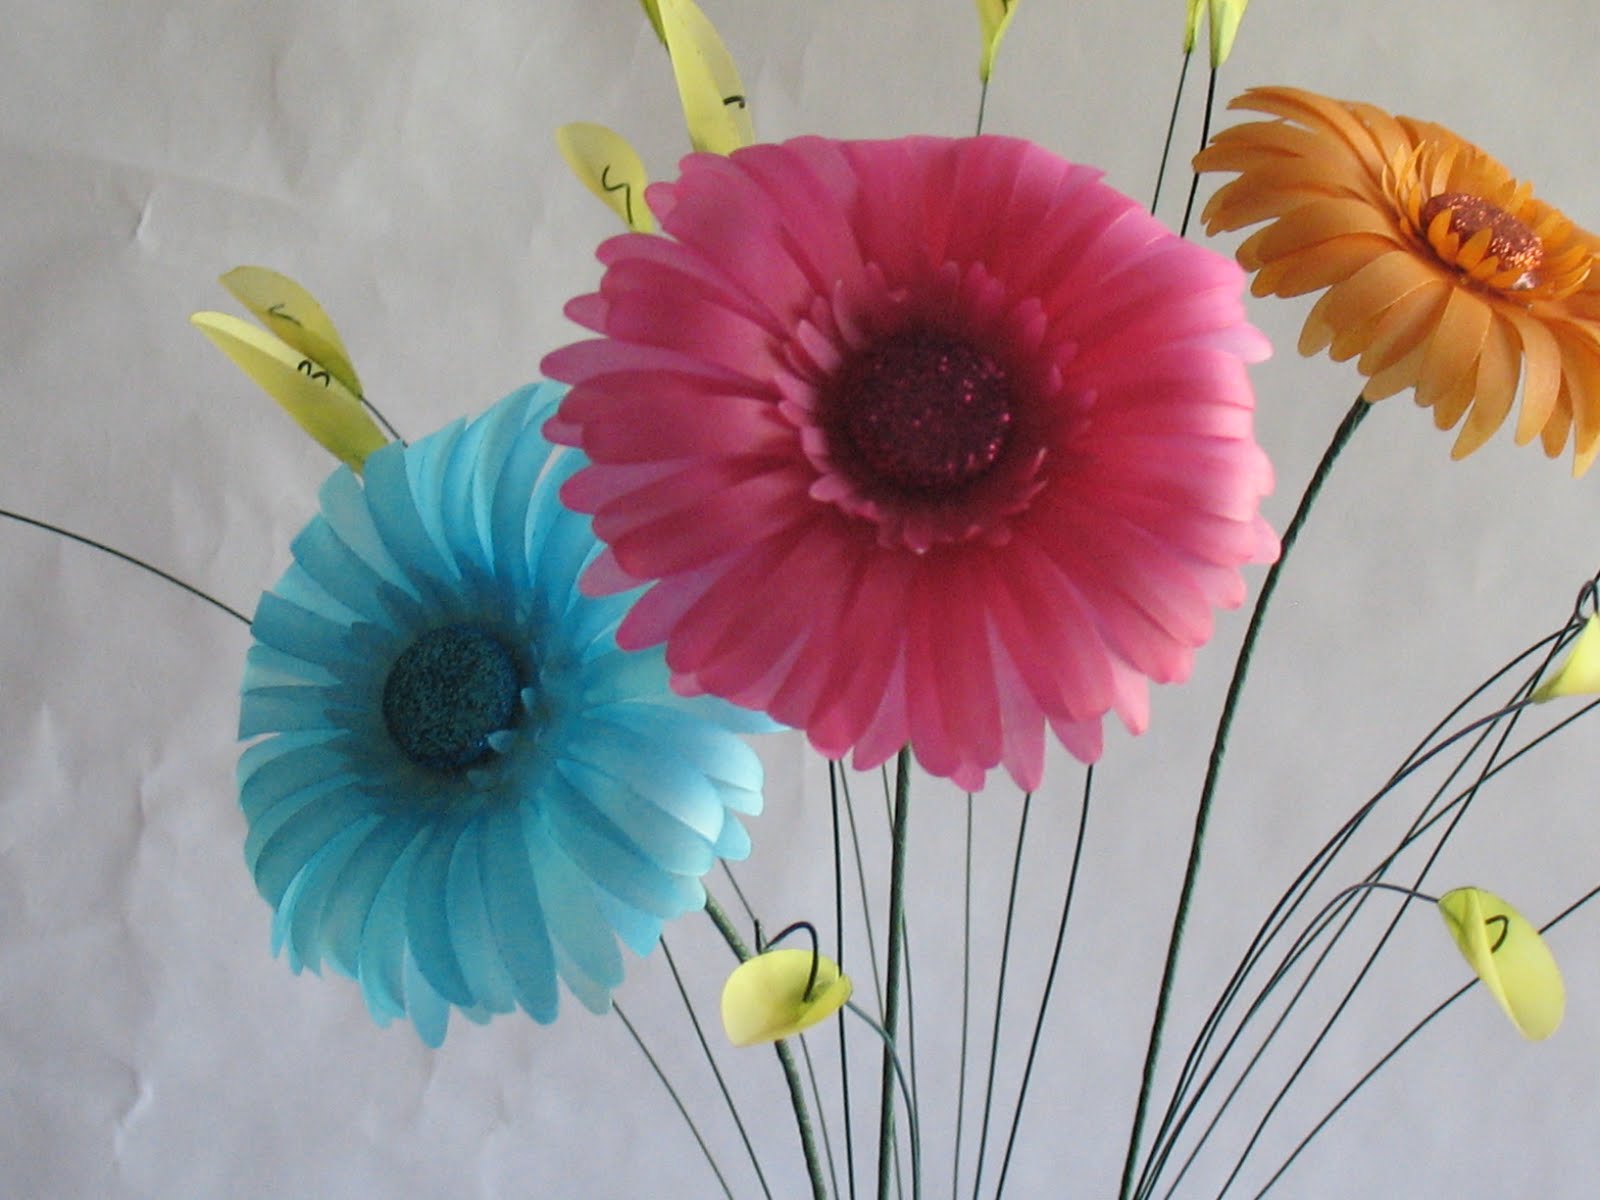
3D Vellum Flowers
I love making 3D paper crafts!
To make a glitter brad, apply VersaMark to the brad, dip it into Heat and Stick powder and heat with heat tool. Dip it into Heat and Stick powder again, reheat and dip it into glitter. Heat to secure the glitter, but be careful not to overheat or the glitter will become dull! Let cool.
The daisies are made from vellum cut with the Big Shot and the Daisy die. I coloured 4 large and 2 small flowers with ink and a sponge dauber on both sides for each daisy. Then curl the petals against a bone folder.
Use adhesive between the layers and adhere circles of card stock on the top and bottom, then punch a hole through the stack. Apply glue dots to the underside of the brad and insert it into the hole.
Put a glue dot between the prongs of the brad and insert a length of floral wire. Wrap with floral tape.
For the small filler flowers use the small oval punch to cut the vellum and sponge ink onto both sides. When dry apply a glue dot to one end and place a length of fine floral wire with a curled end on the adhesive and pinch it closed.
For the dragonfly wings I stamped the outline image with VersaMark on vellum and heat embossed with Iridescent Ice embossing powder. After cutting the wings out I used sponge daubers and ink to colour them. Use glue dots to adhere the wings to the beaded body.
Daisy Supplies
-Vellum card stock 101856 IBC p. 170
-Big Shot 113439 IBC p. 204
-Daisy die 114520 IBC p. 207
-glue dots 103683 IBC p. 197
-Heat and Stick powder 100625 IBC p. 196
-Stampin' Glitter IBC p. 196
-5/8 in. Jumbo brads 112533 IBC p. 187
-bone folder 102300 IBC p. 198
-sponge daubers 102892 IBC p. 195
-Versamark pad 102283 IBC p. 195
-Heat Tool 100005 IBC p. 196
-floral wire and floral tape (not SU)
Filler Flowers Supplies
-Small Oval punch 119863 IBC p. 203
-glue dots 103683 IBC p. 197
-sponge daubers 102892 IBC p. 195
-floral wire (not SU)
Dragonfly Supplies
-Pick a Petal stamp set 115042 IBC p. 135
-Versamark pad 102283 IBC p. 195
-Iridescent Ice embossing powder 101930 IBC p. 196
-Heat Tool 100005 IBC p. 196
-sponge daubers 102892 IBC p. 195
-glue dots 103683 IBC p. 197
-beads and wire (not SU)
Sunday, August 15, 2010
Regals Colour Combination
Bright Colour Combination
Sunday, August 1, 2010
Vellum Techniques #3
To create the white accent lines on the image I loosely traced on the back of the vellum with the small end of an embossing stylus. The stylus will glide easily if you rub waxed paper over the vellum. When the image is coloured on the back with markers the lines stay white. Don't be too neat if you want the look of watercolour.
On the die cut vellum piece I repeated the background stamp on the card with White Craft ink.
The adhesive is hidden under the ribbons and the punched sentiment.
Supplies
Stamps
Fast and Fabulous level 2 Hostess set 118754 IBC p. 13
French Filigree background 113742 IBC p. 142
Watercolor Trio set 117050 SMC p. 16
Ink IBC pp. 165-169
Marina Mist pad
Not Quite Navy pad
Certainly Celery pad and marker
Bashful Blue marker
Whisper White Craft pad
Paper IBC pp. 165-170
Card Stock Vellum
Marina Mist
Certainly Celery
Bashful Blue
Whisper White
Tools
Big Shot 113439 IBC p. 204
Top Note die 113463 p. 207
large oval punch 119855 IBC p. 203
small oval punch 119863 IBC p. 203
Accessories
Certainly Celery 1/8 in. taffeta ribbon 119959 IBC p. 191
Basic Pearls 119247 IBC p. 188
Vellum Techniques #2
On the underside of the vellum I used sponge daubers to lightly add colour. Keep checking the front until you're satisfied. I used a marker to colour the stamens, also on the underside.
To hide the adhesive, I used 1/4 in. Sticky Strip double sided tape and followed the edges of the vellum. There's no need to mitre, just start at a corner and trim at the end. The last strip butts up against the first.Then, I flipped the vellum over and applied Snail adhesive just under the Sticky Strip and adhered the vellum to the card stock mat.
Finally, I removed the top covering of the Sticky Strip and applied the glitter. You can use Sticky Strip with beads and micro-beads to make accents for scrap books, too.
Supplies
Stamps
-Fifth Avenue Floral set 113734 IBC p. 122
-All Holidays set 114916 IBC p.154
Ink IBC pp 165-169
-Whisper White Craft Stampin' Pad
-River Rock pad
Paper IBC pp. 165-170
-River Rock
-Blushing Bride
-Pink Pirouette
-Vellum card stock
Accessories
-Sticky Strip 104294 IBC p. 197
-Dazzling Diamonds glitter 102023 IBC p. 196
-Very Vanilla 1/8 in. taffeta ribbon 119960 IBC p. 191
-Stampin' Dimensionals 104430 IBC p, 197
Tools
-small oval punch 119863 IBC p. 203
-large oval punch 119855 IBC p. 203
-sponge daubers 102892 IBC p. 195
Friday, July 23, 2010
Vellum Techniques: Vellum Overlay
Vellum is a translucent paper that creates a dreamy effect on paper crafts. I have never found a truly invisible adhesive, so I usually find a way to conceal the adhesive in my design.
Stampin' Up! carries regular vellum and a heavier card stock vellum. Both are useful for different effects. You can also find coloured and printed vellum.
Simply covering a stamped mat with vellum softens the image. On this sample I coloured the images with markers and stamped on card stock.
Next, I stamped a sentiment on vellum card stock and used a marker on the underside to highlight a key word. Try it with your journaling on a scrap book page.
The adhesive is hidden under the ribbon and the rhinestone brad helps hold the vellum down.
Supplies
Stampin' Up! carries regular vellum and a heavier card stock vellum. Both are useful for different effects. You can also find coloured and printed vellum.
Next, I stamped a sentiment on vellum card stock and used a marker on the underside to highlight a key word. Try it with your journaling on a scrap book page.
The adhesive is hidden under the ribbon and the rhinestone brad helps hold the vellum down.
Supplies
Stamps
-Just Believe 116948 IBC p. 109
Paper IBC pp. 165-170
-Pink Pirouette card stock
-Regal Rose card stock
-Pretty in Pink card stock
-Vellum card stock
Ink IBC pp. 165-169
-Pretty in Pink marker
-Regal Rose marker
-Rose Red marker and pad
-River Rock pad
-Old Olive marker
-Always Artichoke marker
Accessories
-Old Olive 3/8 in. taffeta ribbon 119767 IBC p. 191
-Square Ice brads 109113 IBC p. 187
Tools
-Stamp-a-ma-jig 101049 IBC p. 198
Paper IBC pp. 165-170
-Pink Pirouette card stock
-Regal Rose card stock
-Pretty in Pink card stock
-Vellum card stock
Ink IBC pp. 165-169
-Pretty in Pink marker
-Regal Rose marker
-Rose Red marker and pad
-River Rock pad
-Old Olive marker
-Always Artichoke marker
Accessories
-Old Olive 3/8 in. taffeta ribbon 119767 IBC p. 191
-Square Ice brads 109113 IBC p. 187
Tools
-Stamp-a-ma-jig 101049 IBC p. 198
Subscribe to:
Posts (Atom)