My Not Quite White Christmas theme inspired me to make tops for my girls and I to wear for our Holiday get-together. (The boys got Tim's cards.)
I started with cotton T-shirts from Costco and used some Stampin' Up! product somewhere on each of them.
Ruth's Top
Crumb Cake 127840 and Early Espresso 127839 Scalloped Tulle roses with Vintage Faceted buttons 127555 adorn the left shoulder of Ruth's tea-dyed T-shirt.
Abbey's Top
I cut a new neckline, trimmed it with lace and encased the raw edges with Whisper White 3/8 in. Taffeta ribbon 109070. (See the instructions for Celeste's Top to see how to encase an edge with trim.) Then I added another row of lace attached to the ribbon at intervals and topped it off with a row of narrow lace trim. Abbey's hates beige so I left her top white.
Here's a close-up of the neck.
Grace's Top
I tea-dyed a t-shirt and the sleeves from Celeste's top. (See below) Using the Big Shot 113439 and Fun Flowers die 121812, I cut several flowers from the extra sleeves and from Crumb Cake 127840 and Early Espresso 127839 Scalloped Tulle. Stack a tulle flower on a knit flower and sew 3 pearl beads to the centre on the neckline.
Celeste's Top
After replacing the sleeves with half doilies I tea-dyed it.
Cut off the sleeves from a t-shirt close to the seam and sew the seam allowances inside the armhole.
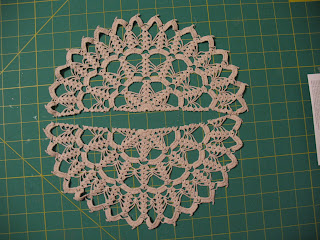
Cut a large doily in half and handle gently.
Measure around the arm and cut a length of 7/8 in. Cotton Ribbon 127844 allowing for movement. (Mine was 13 in.) Hand-baste the cut edge of the doily just below the centre of the ribbon.
Here's a close-up.
Fold the ribbon closed and machine stitch the edges together, encasing the cut edge of the doily. Remove the basting threads. Join the ends of the ribbon, creating the sleevebands.
Measure and mark the armhole at intervals. Pin the points of the doily to the armhole. Sew close to the edge of the armhole catching the doily in the seam.
Cheryl's Top
I made a cardigan from a t-shirt and a dresser cloth doily and tea-dyed it.
Cut a rectangular dresser cloth in half lengthwise. Hand stitch two short ends together to make a long strip.
Cut the t-shirt front up the middle with a v-neckline. Lay flat and measure the cut edge. Cut a length of Victoria Crochet trim 118481 the same measurement plus 1 in.
Hand baste the doily strip to the front and neck edges of the cardigan. (Not shown) Pin the crochet trim to the edge over the doily strip and fold 1/2 in. to the inside at the hem. Machine stitch through all layers 1/4 in. from the edge.
Fold the crochet trim over the seam to the inside. Machine stitch close to the edge.
This is how the right side looks. Tea-dye the cardigan.
Sunday, December 30, 2012
Tuesday, December 18, 2012
VersaMark Techniques: Heat Embossing
I stamped the background images with ink and swiped them with an embossing buddy. Then, I stamped the outline images with VersaMark. Cover with Gold Embossing Powder and shake off the excess before heating with a heat tool. When cooled, colour the berries and the pine cone with a marker.
I also used VersaMark and Gold Embossing Powder to change the Flourish Designer Frames from silver to gold.
-press the right side of the frame against the VersaMark pad
-lift the frame with tweezers, don't touch the edges
-cover the frame with embossing powder and shake off the excess
-heat with a heat tool to melt the embossing powder
-the frame will be very hot so let it cool completely
-handle it gently
Supplies
Stamps
-Watercolour Winter 129724
Ink
-Crumb Cake pad 126975
-Soft Suede pad 126978
-VersaMark pad 102283
-Chocolate Chip marker
Paper
-Very Vanilla card stock 101650
Tools
-Heat Tool 129053
-Decorative Label punch 120907
Accessories
-Flourish Designer Frames 127835
-Gold Embossing Powder 109129
-Soft Suede 3/8 in. Taffeta ribbon 122967
-glue
I also used VersaMark and Gold Embossing Powder to change the Flourish Designer Frames from silver to gold.
-press the right side of the frame against the VersaMark pad
-lift the frame with tweezers, don't touch the edges
-cover the frame with embossing powder and shake off the excess
-heat with a heat tool to melt the embossing powder
-the frame will be very hot so let it cool completely
-handle it gently
Supplies
Stamps
-Watercolour Winter 129724
Ink
-Crumb Cake pad 126975
-Soft Suede pad 126978
-VersaMark pad 102283
-Chocolate Chip marker
Paper
-Very Vanilla card stock 101650
Tools
-Heat Tool 129053
-Decorative Label punch 120907
Accessories
-Flourish Designer Frames 127835
-Gold Embossing Powder 109129
-Soft Suede 3/8 in. Taffeta ribbon 122967
-glue
Wednesday, December 12, 2012
Glimmer Doily Ornaments
Enough fabric already! These Doily Ornaments are easy to make with the Big Shot.
I used Sizzlits dies to cut a variety of doilies from card stock. The Glimmer Paper was cut with Bigz dies and the large Scallop punch. Then, I enjoyed a movie while gluing and embellishing with buttons, brads and jewels.
Spoiler Alert! That gorgeous brad in the middle is from the new Spring Catty. I couldn't resist using them when my pre-order arrived. They're actually silver, so I changed them with VersaMark and Gold embossing powder. I'll show you how in my next post.
Supplies
Paper
-Whisper White card stock 100730
-Very Vanilla card stock 101650
-Champagne Glimmer paper 127885
Tools
-Big Shot 113439
-Paper Doily Sizzlit L 125592
-Delicate Doilies Sizzlits L 126999
-Scallop Circle Bigz 113468
-Perfect Pennants Bigz L 123126
Accessories
-Antique brads 117273
-Basics Glimmer brads 121003
-Rhinestone Basic Jewels 119246
-Pearl Basic Jewels 19247
-Large Pearl Basic Jewels 125577
-Vintage Faceted buttons 127555
-Multi-purpose Liquid Glue 110755
Sunday, December 9, 2012
Paper Cone Ornaments
I cut 6 inch squares of Natural Composition Specialty Designer Paper (126917) from Stampin' Up! for these rolled cone ornaments. The designs are embossed, so I sponged Soft Suede ink all over for contrast. Then, I sprayed the squares with Shimmer mist (see recipe below) and let them dry completely.
This paper is more like card stock, so I rolled the wrong side against the edge of my desk to get it to curl, making it easier to roll into a cone. For a pretty lining, I cut triangles from 6 inch squares of the Neutrals Collection Designer Series Paper Stack (117157) and adhered them to the inside of the open end of the square. Then, I used TomBow Multi-purpose liquid adhesive (110755) to glue the cones closed.
Punch 2 holes in the top. Tie a hanging loop in 15-20 in. of ribbon, depending on whether you want to tie a bow. Thread the ends of the ribbon through the holes from the back and tie in the front. Embellish the cones, fill them with candy and hang on the tree.
Shimmer Mist
In a small spray bottle, combine 2 oz. 70% Rubbing Alcohol and 1/2 Teaspoon Shimmer paint. (I used Champagne Shimmer paint 116806) Shake well before using.
Add more paint for more shimmer!
Friday, December 7, 2012
Crazy Quilt Stocking
I used those odd-sized scraps of lace and fabric from my other projects to make crazy quilt stocking ornaments.
The top of this one is embellished with pleated and knotted seam binding. I used Early Espresso and Whisper White Baker's twine (123124) to make the tassel.
Try making my No-Sew ribbon flower to embellish your projects.
Use Baker's twine to crochet that sweet heart from Leigha Rock's wonderful blog.
-trace the outline of the stocking on thin cotton backing fabric
-pin a piece of fabric somewhere in the middle
-cover an edge with another piece of fabric
-sew a 1/4 in. seam
-finger press the fabric over the seam and trim threads
-trim away fabric to make a straight edge for the next piece of fabric
-cover an edge and sew a 1/4 in. seam
-finger press fabric over the seam
-continue adding fabrics until the outline is covered
-trace around the stocking pattern on the wrong side
-layer the crazy quilt piece over lining fabric
-leaving the top open, stitch around the traced line back-stitching at the beginning and end
-cut off the top on the traced line
-trim around the stitching with pinking shears
-turn right side out
-turn over 1/4 in. on top edge and hem
-embellish as desired
Tuesday, December 4, 2012
Fabric Tree Ornaments
These fabric covered ornaments are much faster to make than the ribbon ornaments in my previous post.
I used my Big Shot die cutting machine and the 3 in. and 3-1/2 in. circle dies to cut 2 fabric circles. Follow the directions below to cover a styrofoam ball, then cover the stitching and make a hanging loop with ribbon.
For the gold organza ball, I covered the stitching with 2 rows of 1/4 in. wide Sticky Strip (104294) and rolled it in Champagne Glass Glitter (120997). Use a long needle to bring the ends of a length of Baker's twine through the ball from the bottom to the top. Cover the stitch on the bottom with a circle of Sticky Page and press it into glitter, then insert a Basics Glimmer brad (121003). Use the ends of the twine at the top to tie the ribbon loop and bow in place.
-cut the fabric with the 3-1/2 circle die and the Big Shot (I trimmed 1/8 in. for the size of ball I had)
-fold the circle in half and mark the fold with pins
-open the circle and fold again with pins together
-mark the fold with pins
-open the circle and fold again with pins together
-mark the fold with pins
-open the circle and fold again until 8 pins mark the edge
-mark the ball and measure around the middle
-mark the ball into quarters
-match the quarter marks of the fabric circle and the ball and pin in place
-pin the remaining pin markings of the fabric to the ball
-pin the second circle to the ball in the same way
-stitch the edges of the fabric together so that they just meet to reduce bulk
-the ball looks like this
-measure a length of ribbon to go around the ball and form a loop with a bow
-hold ribbon in place with pins and sew it to the ball to hide the stitching around the middle
-form a loop and tie a bow to secure it
Sunday, December 2, 2012
Ribbon Tree Ornaments
These tree ornaments are made with Stampin' Up! ribbons pinned to styrofoam balls.
Use short steel head pins.
I used Ribbon Widths (RW) to measure the length of ribbon needed.
If 5/8 in. wide ribbon is used, then 4RW will be 2-1/2 in. long. (That's 5/8 X 4 = 2-1/2)
-cut 4 strips of ribbon, 4RW long
-push a pin through the middle of the ribbon strip about 1/16" from the edge
-push the pin into the styrofoam ball (mine had a line like the equator)
-fold the ends of the ribbon back forming a point and hold in place with more pins
-if the pinhead isn't hidden then place the pin farther from the edge of the ribbon
-place all 4 strips of ribbon adjusting as needed to cover the ball
-cut 8 strips of ribbon, 4 RW long for the next row
-pin 4 strips over the bias joins of the previous row first, then pin 4 strips between them
-continue placing ribbons over the previous ribbons until half the ball is covered
-remove pins holding the ends NOT the points as you go
-turn the ball over and place a pin in the centre along the equator
-cover this side of the ball the same as the first side
-stitch through all layers of ribbon around the ball to hold them in place
-trim ribbon ends
-remove any unnecessary pins
-tie a ribbon around the ball to hide the stitching and make a hanging loop
Sunday, November 25, 2012
VersaMark Techniques: Heat and Stick Glitter
VersaMark is a thick, clear medium with many uses. Stampin' Up! offers it in a pad and a refill bottle. You can also find it elsewhere in a marker, but I squeezed some from the bottle and used a dried-up blender pen to apply it to my image. I found I could apply it thicker and increase the open time, too.
Heat and Stick powder adheres to VersaMark. Then, when it's heated you can cover it with glitter and heat emboss again to hold the glitter.
-stamp the image and swipe it with an Embossing Buddy
-squeeze some VersaMark into a lid and apply to the image with a dried-up blender pen
-pour Heat and Stick powder over the image and shake off the excess
-use your Heat Tool to melt the powder
-pour Dazzling Diamonds glitter over the image and shake off the excess
-use a small paint brush to remove any stray glitter
-use your Heat Tool to melt the powder again to hold the glitter
Supplies
Stamps
-Christmas Lodge 123767
Ink
-Marina Mist pad 126962
-VersaMark Ink refill 102193
Paper
-Whisper White card stock 100730
-Bashful Blue card stock 105120
-Marina Mist card stock 119682
Tools
-Big Shot 113439
-Labels Collection Framelits 125598
-Northern Flurry embossing folder 120902
-1/2 in. Circle punch 119869
-Embossing Buddy 103083
-Blender pen 102845
-Heat Tool 129053
Accessories
-Heat and Stick powder 100625
-Dazzling Diamonds glitter 102023
Subscribe to:
Posts (Atom)