Sunday, June 24, 2012

Dry Embossing Techniques: Partial Folders

To emboss a portion of card stock, just insert the mat as far as you want into the embossing folder. (Or, you can use mats and follow the instructions in the previous post.)

Use the Simply Scored tool to separate the different textures.

Supplies
Stamps
-The Open Sea 123030
-Itty Bitty Banners 126255
Ink
-Early Espresso pad 126974
Paper
-Not Quite Navy card stock 126971
-Sahara Sand card stock 126976
-Cherry Cobbler card stock 126966
-Naturals White card stock 102316
Tools
-Big Shot 113439
-Houndstooth folder 123134
-Stripes folder 123128
-Simply Scored scoring tool 122334
-Paper Piercing tool 126189
-Essentials Paper-Piercing pack 126817
-2-1/2 in. Circle punch 120906
Accessories
-Early Espresso Baker's twine 123124
-Metallic brads 119741

Wednesday, June 20, 2012

Dry Embossing Techniques: Frame

It was so hard to choose from the many beautiful and exclusive Stampin' Up! embossing folders for the Big Shot for this technique!

The idea is to use a shim to emboss only a portion of a mat.


 Place the card stock mat into the embossing folder on top of the Big Shot platform on Tab 2.
 Place a mat board photo frame over the embossing folder and cover it with a clear cutting pad. (I bought my photo frame at a craft store.)
Run this stack through the Big Shot and remove the mat from the folder.
The oval area will not be embossed.
 Place the photo frame on a work surface.
 Lay the partially embossed card stock mat over the photo frame and press around the oval with your fingers to make a slight indentation.
 Use a stylus to carefully follow the oval shape.
Punch some flowers from white card stock and snip between each petal toward the centre. Use a Sponge Dauber to add a little yellow ink.
Use the rounded end of a pen on the Stampin' Pierce Mat to shape the  flowers.


Supplies
Stamps
-One in a Million 126380
Ink
-Always Artichoke pad 126972
-So Saffron pad 126957
Paper
-So Saffron card stock 105118
-Baja Breeze card stock 111352
-Whisper White card stock 100730
-River Rock card stock 108640
Tools
-Big Shot 113439
-Elegant Lines embossing folder 119277
-Simple Scored stylus 125624
-Stampin' Pierce Mat 126199
-Boho Blossoms punch 119858
-Bird Builder punch 117191
-Sponge Daubers 102892
Accessories
-Basic Pearls 119247

Friday, June 15, 2012

Floral District Apron

Careful cutting of three Fat Quarters into 2-1/2 in. strips is important when making this Chevron apron.
Wash and dry the fabric to allow for shrinkage.
Layer the fabrics and use a rotary cutter on a cutting mat to square and trim the edges. Mine measured 17-1/2 in. X 26-1/2 in.
First, cut two 2-1/2 in. X 17-1/2 in. strips using the width of the fabric.
Cut a purple strip into a 2-1/2 in. square and a 14 in strip. Discard the remaining scrap.
Cut a small floral strip into a 5 in. strip and a 7 in. strip. Discard the remaining scrap.
Cut a large floral strip into a 9-1/2 in. strip and discard the rest.
Cut the second large floral strip into a 12 in. strip and discard the rest.
Then cut the remaining fabrics into six 2-1/2 in. X 21-1/2 in. strips.
You'll also need about 6 yards of 1/2 in. double fold bias tape. I used bright yellow.


Using a scant 1/4 in. seam allowance, sew the purple square and the 5 in. small floral strip together.


Finish the raw edges with a serger or machine zigzag stitch.
Press the seam toward the longer strip.


Sew the 7 in. small floral strip across the end of the first section.
Finish the raw edge and press the seam toward the new strip.
Sew the 9-1/2 in. large floral strip to the left side, then finish and press.
Sew the 12 in. large floral strip to the right side, then finish and press.
Sew the 14 in. purple strip to the left side, then finish and press.
Sew a 17-1/2 in. purple strip to the right side, then finish and press.
Using the remaining long strips continue the pattern until there are no more purple strips.

Fold the piece down the centre and trim the bottom.


Place the edge of a clear cutting tool along the centre fold and the 4-1/2 in. mark at the outer edge and trim off top.
Fold the trimmed bottom edge to the top and trim off sides 13 in. from fold.
Open the apron and sew double fold bias tape across top. Sew bias tape down the side, across the bottom and up the other side.
Measure 3 yd. of bias tape and fold in half to find the middle. Measure 11 in. on both sides of the middle for neck band. Pin bias tape to the remaining unfinished edges of the apron and sew the bias tape closed. Tie a knot in each end.


Supplies
-Floral District fabric 1268893
-1/2 in. double fold bias tape

Tuesday, June 12, 2012

Dry Embossing Techniques: Textured Stamping

Use the Big Shot and an embossing folder to add texture to a stamped mat.


Supplies
Stamps
-Elements of Style 118611
Ink
-Cherry Cobbler 126966
Paper
-Cherry Cobbler card stock 119685
-Whisper White card stock 100730
Tools
-Big Shot 113439
-Square Lattice embossing folder 119976
-Lots of Tags Sizzlits 114508
-Extra Large Oval punch 119859
Accessories
-5/8 in. Organza ribbon 114319

Tuesday, June 5, 2012

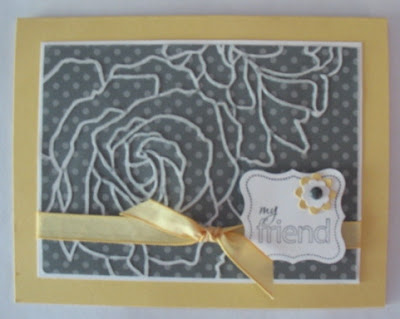
Dry Embossing Techniques: Sanded DSP

I sanded the embossed design on Designer Series Paper, exposing the white core.

Quick and cute!

Use the Big Shot with the Manhattan Flower embossing folder to emboss the floral images on Basic Gray DSP.
Adhere the DSP to the white card stock mat to give the paper some stability.
Use a sanding block to gently remove the printed layer of the paper.


Supplies
Stamps
-Perfect Punches 117022
Ink
-Basic Gray ink pad 126981
Paper
-So Saffron card stock 105118
-Whisper White card stock 100730
-Neutrals Designer Series Paper Stack 117157
Tools
-Curly Label punch 119851
-Boho Blossoms punch 119858
-Itty Bitty Shapes punches pack 118309
-Big Shot 113439
-Manhattan Flower folder 114517
-Sanding block 124304
Accessories
-Neutrals brads 119736
-Stampin' Dimensionals 104430
-So Saffron Taffeta ribbon 122982

Here's another one! I used the Flower Garden embossing folder with the Big Shot and sanded the raised image.

This one uses Daffodil Delight card stock and stitched gross-grain ribbon. The sentiment is from the Layered Labels stamp set and punched with the oval punch, Scallop Oval punch and Modern Label punch.


Friday, June 1, 2012

Beau Chateau Apron

It's June 1st! The first day of ordering from the New Catalogue! You can see it from the link in the left column. It's also Friday which means I'm sharing a fabric project.

Stampin' Up! fabric comes in sets of 3 Fat Quarters. I love the French Country feel of the roosters and florals in the Beau Chateau fabric.

The crochet trim and buttons are also from Stampin' Up!

It's a good idea to wash and dry the fabrics before making a project that will be washed because there will be some shrinkage.


Press the washed and dried fabrics and layer them on a cutting mat.
Trim the smallest amount of fabric while squaring them. Mine measured 17-3/8 in. X 26-1/4 in.

Blue Floral
Border-cut a 10 in. X 26-1/4 in. strip
Pocket lining and bands-cut two 7 in. X 9 in. pieces
Pink Dots
Waistband-cut a 4 in. X 26-1/4 in. strip
Ties-cut two 3 in. X 26-1/4 in. strips
Pockets-cut two 7 in. X 6 in. strips
Interfacing
-cut a 2 in. X 26-1/4 in. strip

Hem the sides of the rooster print by turning over 1/4 in. of fabric twice and stitch close to the folded edge.
Sew the blue floral to the bottom of the rooster print with a 1/2 in. seam allowance. The blue floral border fabric will extend past the hemmed sides by 1/2 in. each side.


Press the seam toward the blue floral fabric.
With right sides together, fold the blue floral border double with 1/2 in. of fabric extending past the seam.
Sew both sides with a 1/2 in. seam allowance.


Snip the corner at a shallow angle and press the seam open.


Trim the corner where the blue floral fabric is joined to the rooster print.
Turn blue floral border right side out.
Press under 1/2 in. seam allowance on facing.


Cut 27 in. of Victoria crochet trim.
Fold under 3/8 in. of ends and position over the border seam.
Sew to apron skirt closing the border facing seam.


Place interfacing on waistband.
Sew 2 rows of basting.


Cut a notch in the waistband and the skirt to mark the middle.
Cut notches in the waistband 10 in. from the middle on both sides.


Place a pin in the waistband 1 in. from the middle notch.
Then place 3 more pins spaced 1-1/2 in. apart.


Pin the apron skirt to the waistband matching the notches.
Secure the first pin through both layers.


Fold the skirt fabric back and pin 1/4 in. away through all layers.


Fold the skirt fabric forward and secure to waistband with next marking pin.


Continue forming pleats until the hemmed sides of the skirt meet the outer notches in the waistband.
Sew the skirt to the waistband using a 1/2 in. seam allowance.


Narrow hem both ties.
Fold in half lengthwise and sew across one end on both ties.


Press seam open


Turn right side out and press.


Pin ties to ends of waistband and form a pleat.

Sew to waistband.


Fold waistband right sides together and turn back 1/2 in. seam allowance on the waistband facing.
Sew across the ends of the waistband.
Trim seams.
Turn right sides out and trim corners to reduce bulk.
Pin waistband opening together.
Hand sew facing over seam.
Place pocket and lining piece together and sew 1/4 in. seam.
Press seam toward blue floral fabric.
Fold right sides together matching raw edges.
Sew 1/2 in. from raw edges, trim corners and press seams open.
Remove 2 in. of stitching from seam holding pink dots to blue floral.
Turn pockets right side out through opening and press.
Cut crochet trim the width of the pocket plus 3/4 in.
Fold under 3/8 in. on ends of trim and position over pocket seam.
Sew to pocket closing opening.
Cut 3-1/2 in. crochet trim and fold ends to middle.
Sew through all layers and pull thread to gather.
Secure the thread and sew bows to pockets.
Sew a button over the bow.
Position the pockets 3 in. above the border seam and 2-1/2 in. from the sides of the skirt.
Sew the pockets to the skirt.


Supplies
-Beau Chateau Fabric 122336
-Victoria Crochet trim 118481
-Neutrals Buttons 119743
-interfacing and thread