Monday, December 23, 2013

Big Shot Snowman Applique

The Big Shot is a useful tool for both of my favourite hobbies; sewing and paper crafts. I used framelits and the Big Shot to make the patterns for the Snowmen on my Lap Quilt.


Choose Fabrics (from left)
-1 grey and aqua print for hats (scrap)
-1 aqua print for hats (scrap)
-1 aqua print for hats and binding (0.50 m.)
-1 light aqua snowflake fabric for background (2.00 m.)
-3 red prints for hats and sashing (0.20 m.)
-1 white print on pale aqua background for snowmen (0.30 m.)
-3 white on white prints or pale print on white for snowmen and sashing (0.50 m.)
-backing fabric (2.70 m.)
-batting (1.50 m. X 1.90 m.)

Snowman Pattern
-use a compass to make circle patterns or trace a household item
(I traced a cheesecake pan for the 9 in. circle and a cereal bowl for the 6-1/2 in. circle. I used a Big Shot framelit to cut the 3-5/8 in. circle.)
-cut 3 large circles and 3 medium circles from the white print on pale aqua
-cut 3 large circles and 3 medium circles from the pale print on white
-cut 2 large circles, 2 medium circles and 5 small circles from each of the white on white prints

-arrange the large circles on the background fabric and sew 1/4 in. from the raw edge
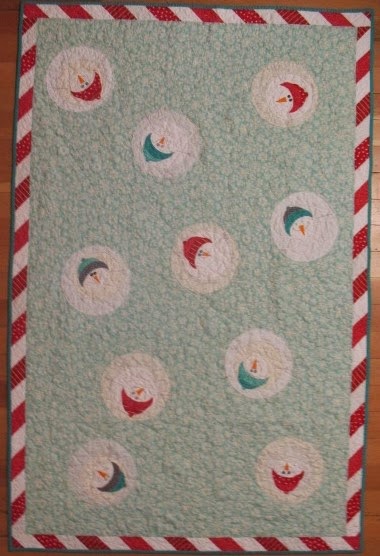
-stack medium circles on the large circles and sew 1/4 in. from raw edge
-stack small circles on medium circles and sew 1/4 in. from raw edge

(I left the edges of the snowmen unfinished so they would fray)


Hat Pattern
-cut half circles using 3-1/4 in. framelits with the Big Shot or trace the framelit and cut with scissors
-cut smallest circles with the Big Shot or trace the framelit and cut with scissors


-cut card stock oval with framelit using the Big Shot
-position framelit over oval and cut hat brim pattern
-trace the pattern on fabric and cut with scissors


-stack hat pieces and position on the snowmen heads
-sew around edges with close zigzag stitch starting with pom-pom


-use circle and oval framelits as templates for mouths
-trace curve with a Frixion pen (the ink disappears with heat)


-zigzag mouth over marking
-zigzag arms
(I used grey thread for the mouths and arms)
-cut triangles of a scrap of orange fabric for noses
-zigzag noses to face

-pull zigzag threads through fabric to wrong side
-thread ends into needle and anchor under stitching
-trim ends of threads


-sew red and white strips together using a scant 1/4 in. seam and staggering the ends by 2-1/2 in.
-press the seams toward the red strips
-sew 2 sets of 4 strips and 1 set of 2 strips


-use a quilting ruler to cut 2-1/2 in. wide strips at a 45 degree angle
-sew strips together into a long sashing strip
-sew sashing to long sides of quilt top
-sew sashing to short sides of quilt top
-layer quilt top, batting and backing fabric
-pin through layers
-quilt layers together (I sewed simple snowflakes of over-lapping x's with white thread)
-cut 2-1/2 in. binding strips from aqua print and sew into long strip
-fold in half lengthwise and press
-sew to edges of quilt (see detailed tutorial)
-sew button eyes to snowmen (I used Stampin' Up! buttons)

Stampin' Up! Supplies
-Big Shot 113439
-Circles Collection framelits 130911
-Ovals Collection framelits 129381
-Neutrals buttons 130031 (Basic Black and Smoky Slate)
-Brights buttons 130028 (Bermuda Bay)
-Regals buttons 130029 (Island Indigo)
-Subtles buttons 130030 (Pool Party)

Tuesday, December 3, 2013

Noel Paper Pumpkin

The November Paper Pumpkin makes 4 beautiful Xmas cards. I love them just as they are!

But, 4 cards wouldn't be enough for my friends and family card list. So I came up with a simple design using the elements from the kit plus some Real Red (102482) and Very Vanilla (101650) card stock to make a stack of cards. You're going to need more Vanilla (107300) envelopes, too.


-stamp the sentiment on 1-1/2 in. X 4-1/4 Vanilla card stock mat
-cut the striped card base on the score line, then cut 1/2 inch wide strips.
-adhere the strips under the edges of the stamped mat and adhere it to a Real Red card base
-cut a length of 8 stars from the garland and adhere them to the card front

Note - One striped card base = 22 strips (1/2 in. X 4-1/4 in.) which will make 11 cards


If you need an excessive number of cards you can cut the stars apart and adhere 3 or so to each card front.


Don't forget to stamp the envelopes!


Do save some of the star garland to make a banner from the "NOEL" pennants.


-cut 2 striped card bases in half
-measure and mark 7/8 inch from the bottom on each side and 2-1/8 inch on the bottom edge
-cut from the side marks to the centre


-stamp the star in red on each NOEL pennant and adhere them to the striped mats
-punch holes and thread onto silver ribbon (132137)
-cut lengths of stars from the garland and adhere them to the pennants


Use up the rest of the star garland on some little gift tags.

-ink only the "Merry Christmas" part of the sentiment and stamp it on 1-3/4 X 3-1/2 Vanilla card stock
-trim the corners, adhere a circle of Real Red card stock over the end and punch a hole for a length of ribbon
-adhere stars from garland

Wednesday, November 6, 2013

Holiday Catty

I designed these two cards for a Holiday Catalogue swap with my Stampin' Up! sisters.


Joyful Christmas Card
-stamp the Poinsettia from the Joyful Christmas set (131802) with Gold Metallic Encore pad (132141) on Cherry Cobbler card stock and cut out
-squeeze dots of Multipurpose Liquid glue (110755) in the centre of the Poinsettia
-cover the glue with Gold glitter (132205) and shake off the excess
-let dry and use a soft paint brush to wipe off loose glitter
-use the Big Shot with the Pretty Print embossing folder (132175) to emboss the Very Vanilla mat
-swipe the embossed mat with the Gold pad and sponge the edges of the large mat
-stamp the sentiment with the Gold pad
-adhere mats to Cherry Cobbler card
-emboss the flap of a Vanilla envelope


Snow Day Card
-stamp snowman from Snow Day set (131892) with Soft Sky pad (131181) on Whisper White card stock mat
-stamp arms, face and buttons with Smoky Slate pad (131179)
-stamp sentiment, toque and scarf with Island Indigo pad (126986)
-adhere strips of Island Indigo card stock under sides of mat and adhere Silver ribbon (132137) ends under strip then tie on a short length of ribbon
-stamp snowflakes with Silver Metallic Encore pad (132142) on Soft Sky card
-stamp snowflakes with Soft Sky ink on a the flap of a Whisper White envelope

If you're not going to mail this card, adhere a Frosted Finishes Embellishment (132150) to the ribbon with a glue dot (103683).


Saturday, October 26, 2013

Label Flip Card

Stampin' Up! unveiled the flip card die collections at our annual convention in July along with some sweet ideas for using them. This card is my version of one of them using the Label flip card die.

The Labels framelits are a perfect to use with this collection.

The Boutique Details embellishment holds the card closed by overlapping the label on the card front.
When opened some cute little die cuts, included in the collection, hang from a length of twine.

The heart die is from the Circle flip card collection. Some of them are embossed, and all of them are different on each side.


Some tips for making this card.

-cut card stock 6 in. X 8-1/4 and score at 2-3/8
-fold and crease on the score line
-place the card stock on the magnetic platform and position the framelit die over it with the crease inside the cutting edge
-fold on the score lines
-apply Sizzix adhesive sheet to silver glimmer card stock
-cut the silver glimmer card stock with a die and the Big Shot
-peel the die cut off the backing paper and adhere it to the card
-pierce the label through the small heart punch
-thread the end of the twine through the hole
-adhere the end of the twine to the back of the label
-adhere the label inside the card
-apply an adhesive foam dot to the embellishment and adhere it to the front of the card over the edge of the front label.


Supplies
Stamps
-Fabulous Phrases 128577
Ink
-Basic Black ink pad 126980
Paper
-Pool Party card stock 122924
-Bermuda Bay card stock 131197
-Strawberry Slush card stock 131295
-Strawberry Slush Core'dinations card stock assortment 129958
-Basic Black Core'dinations card stock assortment 129956
-Blushing Bride Core'dinations card stock assortment 129954
-Modern Medley DSP 126926
-Silver Glimmer card stock 124005
Tools
-Big Shot 113439
-Label flip card framelit collection 133479
-Circle flip card framelit collection 133480
-Labels framelits 125598
-Chevron embossing folder 127749
-Adorning Accetns embossing folder (hearts) 125601
-Small heart punch 117193
-Piercing tool 126189
Accessories
-White Baker's twine 124262
-Strawberry Slush Ruffle Stretch trim 130023
-In Color Boutique Details 130938
-Blushing Bride Stitched Grossgrain ribbon 131209
-Basic Black 1/8 in. Taffeta ribbon 119261
-Pool Party Seam Binding 125582
-Dimensionals foam adhesive dots 104430


Friday, October 25, 2013

Circle Flip Card


I finally got around to using Stampin' Up!'s new Thinlits flip card dies. Such FUN!

This card is CASEd almost exactly from one made by Michelle Reynolds. Check out her blog www.inspirationink.typepad.com. Her idea to use this stamp with a punch art vinyl album is genius!

Not only do you get the die for the card, but the collection includes lots of other embellishment dies including the star I used here.
When you pull the card the circle flips over to the other side.

I used a marker to ink parts of the sentiment and stamp them separately.


Supplies
Stamps
-Bombs Away Photo-polymer set 133411
Ink
-Basic Black marker 100082
Paper
-Tempting Turquoise card stock 102067
-Daffodil Delight card stock 119683
-Basic Black card stock 121045
-Modern Medley DSP 126926
-Silver Foil card stock 132178
Tools
-2-1/2 in. Circle punch 120906
-1 in. Circle punch 119868
-Big Shot 113439
-Thinlits Circle flip card 133480
-piercing tool 126189
Accessories
-122941


Thursday, October 17, 2013

Memo Medley Paper Pumpkin

The October '13 Paper Pumpkin is just too cute! As soon as I opened the box I dropped everything (we had left-overs) and enjoyed my paper crafting escape. Of course, I had to customize it.

I used the ink spots from previous kits to stamp the images from this kit.

With the extra twine I added an unused button from last month's kit.

The pen isn't included in the kit, but at my house it's a good idea to attach one where you'll need it.


-cut a rectangle of paper from the printed roll
-roll the paper around the pen refill and insert it into the barrel


Want to join the fun? Subscribe to Paper Pumpkin from the link on the left.


Sunday, October 13, 2013

Wahoo! Paper Pumpkin

My September Paper Pumpkin arrived and I have to admit I was excited to see the creative surprise it contained.

Poof! Disappointment. (Flimsy card stock, so-so design...) I knew it would happen, but so soon?

Not to worry, there is a happy ending.

I called Stampin' Up! and Voila! They assured me that I could get a refund or product of equal value.

Since I received such great customer service, I decided to try to do something with the kit. And, here's the result.

By joining the envelopes together and making covers from the chipboard packing sheets I made a mini-album. Cut the cards up to make the mats. Then add photos and journalling.


-pierce holes in the front cover mat and attach the button with twine
-a needle threader is my favourite tool for getting the twine through pierced holes
-tie a length of twine around the twine holding the button to the mat and wrap it around the album

Friday, September 13, 2013

Paper Pumpkin?

What is Paper Pumkin? It's like your fairy god-mother helping you to escape the dreary bits of life. Make that a paper-crafting fairy god-mother sending you a surprise kit every month, allowing you a creativity escape.

Want to get started? Click on the Paper Pumpkin link in my left side-bar and subscribe. It costs $24.95 per month, including shipping.

I wasn't sure if I wanted to subscribe, so I ordered the Try It Kit to see what it was all about.
The Try It Kit contains everything you need to make 2 very cute little journals.


Mount the stamp.

The first thing you need to do when you open your kit is assemble the clear-mount rubber stamp.

-peel off the backing from the foam layer on the rubber stamp
-peel the label from the sheet leaving the backing
-the backing on the label is cut into two
-peel away half of the backing
-adhere the exposed sticky side of the label to the foam layer on the rubber stamp
-peel away the rest of the back from the label

-press the label firmly onto the foam layer of the rubber stamp


Make it your own!

I decided to tie the Baker's twine around the pages to make 2 string bookmarks in my journals.
Each bookmark has 2 butterfly card stock stickers adhered back to back on the string.
My butterflies have Baker's twine bodies and antennae.
Because I used 8 butterfly stickers for the bookmarks and 3 on the front of my first journal, I only had 1 left for the second journal. So, I changed the cover layout.
At this point, I decided to subscribe to Paper Pumpkin and see what was in the Welcome Kit!


Welcome Kit


I liked the supplies in the kit, but I was disappointed that the project was 4 cards of the same design.
No matter! I came up with 4 more designs. The Baker's twine is from my Try It Kit, but you could use anything at hand.


My Designs

Design #1
-the piercing can be done with a pin or left out
-after inking the splatter stamp, stamp on scrap paper, then on the mat to lighten the intensity


-cut 1 in. from the bottom of the mat and save it
-cut 2 X 3/8 in. strips from the side of the mat
-turn the strips over and adhere them under the sides of the mat


Design #2
-use 2 of the scallop stickers and trim them to fit on the mat
-cut the over-printed striped strip from the sticker sheet and adhere it over the scallop edge
-adhere the mat to the card front and stamp the sentiment
-tie a string bow in the button and adhere it to the card


Design #3
-cut the over-printed green strip from the sticker sheet and adhere it to the card front
-cut a leaf from a scallop sticker and adhere it to the card front
-cut 2 circles from the mat and adhere the larger circle, dot side up, to the card
-snip around the edge of the smaller circle, curl the petals upward, white side up and adhere it to the larger circle
-stamp the splatter image on a seal sticker
-adhere it to the flower on the card front
-tie a string bow in a button and adhere it to the flower
-stamp the sentiment
Design #4
-use a scrap from the flower card to cut a pennant
-ink "friend" on the sentiment and stamp it on the pennant
-fold the edge of the pennant over a length of string
-use the edge of the clear block to score across a seal sticker
-position the string over the score line
-fold the seal over the string
-thread a button on the string
-score across a striped ribbon sticker and adhere to the string as for the seal sticker
-adhere the banner of pennants to the white side of the mat
-adhere the ends of the string to the back
-adhere the mat to the card front
-stamp the sentiment (I used the Ink Spot from my Try It Kit)
Use the remaining sticker seals and ribbons to decorate the envelopes!


Go ahead! Subscribe to Paper Pumpkin and make it your own. I'll be sharing My Paper Pumpkin here each month.