Sunday, October 13, 2013

Wahoo! Paper Pumpkin

My September Paper Pumpkin arrived and I have to admit I was excited to see the creative surprise it contained.

Poof! Disappointment. (Flimsy card stock, so-so design...) I knew it would happen, but so soon?

Not to worry, there is a happy ending.

I called Stampin' Up! and Voila! They assured me that I could get a refund or product of equal value.

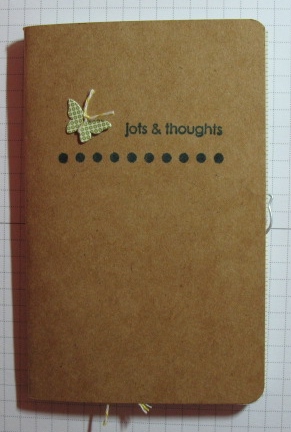
Since I received such great customer service, I decided to try to do something with the kit. And, here's the result.

By joining the envelopes together and making covers from the chipboard packing sheets I made a mini-album. Cut the cards up to make the mats. Then add photos and journalling.


-pierce holes in the front cover mat and attach the button with twine
-a needle threader is my favourite tool for getting the twine through pierced holes
-tie a length of twine around the twine holding the button to the mat and wrap it around the album

Friday, September 13, 2013

Paper Pumpkin?

What is Paper Pumkin? It's like your fairy god-mother helping you to escape the dreary bits of life. Make that a paper-crafting fairy god-mother sending you a surprise kit every month, allowing you a creativity escape.

Want to get started? Click on the Paper Pumpkin link in my left side-bar and subscribe. It costs $24.95 per month, including shipping.

I wasn't sure if I wanted to subscribe, so I ordered the Try It Kit to see what it was all about.
The Try It Kit contains everything you need to make 2 very cute little journals.


Mount the stamp.

The first thing you need to do when you open your kit is assemble the clear-mount rubber stamp.

-peel off the backing from the foam layer on the rubber stamp
-peel the label from the sheet leaving the backing
-the backing on the label is cut into two
-peel away half of the backing
-adhere the exposed sticky side of the label to the foam layer on the rubber stamp
-peel away the rest of the back from the label

-press the label firmly onto the foam layer of the rubber stamp


Make it your own!

I decided to tie the Baker's twine around the pages to make 2 string bookmarks in my journals.
Each bookmark has 2 butterfly card stock stickers adhered back to back on the string.
My butterflies have Baker's twine bodies and antennae.
Because I used 8 butterfly stickers for the bookmarks and 3 on the front of my first journal, I only had 1 left for the second journal. So, I changed the cover layout.
At this point, I decided to subscribe to Paper Pumpkin and see what was in the Welcome Kit!


Welcome Kit


I liked the supplies in the kit, but I was disappointed that the project was 4 cards of the same design.
No matter! I came up with 4 more designs. The Baker's twine is from my Try It Kit, but you could use anything at hand.


My Designs

Design #1
-the piercing can be done with a pin or left out
-after inking the splatter stamp, stamp on scrap paper, then on the mat to lighten the intensity


-cut 1 in. from the bottom of the mat and save it
-cut 2 X 3/8 in. strips from the side of the mat
-turn the strips over and adhere them under the sides of the mat


Design #2
-use 2 of the scallop stickers and trim them to fit on the mat
-cut the over-printed striped strip from the sticker sheet and adhere it over the scallop edge
-adhere the mat to the card front and stamp the sentiment
-tie a string bow in the button and adhere it to the card


Design #3
-cut the over-printed green strip from the sticker sheet and adhere it to the card front
-cut a leaf from a scallop sticker and adhere it to the card front
-cut 2 circles from the mat and adhere the larger circle, dot side up, to the card
-snip around the edge of the smaller circle, curl the petals upward, white side up and adhere it to the larger circle
-stamp the splatter image on a seal sticker
-adhere it to the flower on the card front
-tie a string bow in a button and adhere it to the flower
-stamp the sentiment
Design #4
-use a scrap from the flower card to cut a pennant
-ink "friend" on the sentiment and stamp it on the pennant
-fold the edge of the pennant over a length of string
-use the edge of the clear block to score across a seal sticker
-position the string over the score line
-fold the seal over the string
-thread a button on the string
-score across a striped ribbon sticker and adhere to the string as for the seal sticker
-adhere the banner of pennants to the white side of the mat
-adhere the ends of the string to the back
-adhere the mat to the card front
-stamp the sentiment (I used the Ink Spot from my Try It Kit)
Use the remaining sticker seals and ribbons to decorate the envelopes!


Go ahead! Subscribe to Paper Pumpkin and make it your own. I'll be sharing My Paper Pumpkin here each month. 

Saturday, August 17, 2013

Clay Faux Marble

Does the sentiment look a bit like it's carved in stone? It's actually stamped Simply Pressed Clay!


 -dye 2 pieces of Simply Pressed clay with ink refills
-knead the colours together and place on a hard surface
-position 2 craft sticks on either side of the clay to roll it an even thickness
-stamp the rolled clay and let dry overnight
-cut a shape with the Big Shot and framelit


Supplies
Stamps
-One in a Million 132052
Ink
-Basic Black ink pad 126980
-Smoky Slate ink refill 131159
-Basic Gray ink refill 109121
Paper
-Smoky Slate card stock 131202
-Basic Gray card stock 121044
-Whisper White card stock 100730
-Basic Black card stock 121045
Tools
-Big Shot 113439
-Chalk Talk framelits 129983
-Pretty Print embossing folder 132175
-piercing tool 126189
-rolling pin
-wooden craft sticks
Accessories
-Basic Black 1/8 in. Taffeta ribbon
-Silver 1/8 in. Mini brads 122941

Monday, August 5, 2013

Embossing Powder Rose

The "gold" rose on my card is made from melted embossing powder poured into a Simply Pressed Clay mould. Because the moulds are made of silicone they can handle the heat.

I used an aluminum spoon from an old chemisty set and my heat tool to melt the embossing powder. The handle gets really hot so make sure to protect your fingers. Take a look at a second-hand store for a cheap spoon with a plastic handle. 

The volume of embossing powder really diminishes when it's melted, so you have to use a lot. Also, it loses its metallic look if you heat it too long.

I got inspired to make some wearables, too!


Mount the embellishments on Brushed Gold card stock(102935). Trim it and back it with Coaster Board (129392) and glue on a pin. 


Make two EP roses and glue them to post earring findings.


I swapped some of these at Convention!


-melt some Embossing Powder in a spoon with your heat tool

-pour it into the Simply Pressed clay mould
-press plastic against the back if you want it flat
-BE CAREFUL! It can be hot!
-lift the plastic to remove the flower
-trim away any excess material
-cut a heart from scrap card stock
-position it on the stamped mat with temporary adhesive
-position the cut-out over the heart with temporary adhesive and remove the heart
-arrange the embellishments in the cut out
-adhere the embellishments with glue dots and remove the cut-out


Supplies
Stamps
-En Francais 128562
-Loving Thoughts 128436
Ink
-Crumb Cake pad 126975
-VersaMark pad 102283
Paper
-Naturals Ivory card stock 101849
-Soft Suede card stock 115318
-Baked Brown Sugar card stock 131296
Tools
-Big Shot 13439
-Hearts Collection framelits 125599
-Heat tool 129053
-Blossom and Buttons Simply Pressed Clay moulds 131272
Accessories
-Neutrals Designer buttons 130031
-Very Vintage Designer buttons 129327
-In Color Boutique Details 130938
-Vintage Faceted Designer buttons 127555
-Antique brads 117273
-Pearl Basic Jewels 119247
-Large Pearl Basic Jewels 125577
-Baked Brown Sugar Ruffle Stretch trim 130022
-Victoria Crochet trim 118481
-Glue dots 103683
-Gold embossing powder 109129

Friday, August 2, 2013

Flip Card Framelits are here!

Cards with a mechanism that moves are so much fun but time consuming to make. The new Flip Card framelits from Stampin' Up! are easy to use. Just cut the pieces with your Big Shot and start creating your flip cards.

There are two different sets of framelits. In each one you get the card die and lots of extra die shapes.


133479 Label flip card framelit  $40.95
133480 Circle flip card framelit $40.95

Watch the video to see some inspiring samples. http://www.youtube.com/watch?v=CwdGSYeIn44#at=35

Don't own a Big Shot yet? It's the perfect creative tool. Check out this fun video to see just how much we love it! http://www.youtube.com/watch?v=7B0Be9yOlkQ