Sunday, September 30, 2012

Orchard Harvest Thanksgiving

Use Stampin' Up! Orchard Harvest fabric to make this heartfelt table topper and wreath for Thanksgiving.
The wreath is made from 9 twig hearts I found at a craft store and tied together with 1-1/2 in. X 7 in. fabric strips
For the 27 in. square table topper you'll need:
-one pack of Stampin' Up! fabric (126915) or 3 fat quarters of coordinating cotton prints
-0.40 m. (1/3 yd.) of background fabric
-0.80 m. (7/8 yd.) of backing fabric and batting
All seam allowances are a scant 1/4 in.


-wash and dry the fabrics
Fat Quarters
-layer the prints and trim the side
-cut 7 strips 2-1/2 in. X about 18 in. (the width of the fabric)
Background Fabric
-cut 2 squares 7 in. X 7 in.
-cut 2 strips 2-1/2 in. X 26-1/2 in.
-cut 2 strips 2-1/2 in. X 22-1/2 in.
-cut 5 strips 2-1/2 in. X 10-1/2 in.
-cut 8 squares 2-1/2 in. X 2-1/2 in.
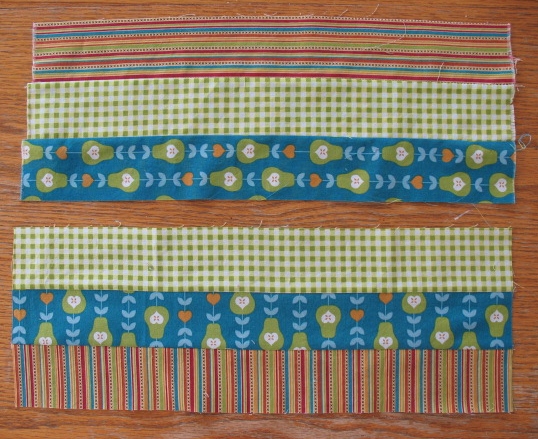

-sew 3 strips together (stripe, check, print) press seams down
-sew 3 strips together (check, print, stripe) press seams up
-sew 5 strips together (stripe, check, print, stripe, check) press seams down
-sew 5 strips together (check, print, stripe, check, print) press seams up
-sew 5 strips together (print, stripe, check, print stripe) press seams down

-sew a 10-1/2 in. strip of background fabric to the top of the second set of strips and press seam up.
-trim ends of sets and cut 4 strips 2-1/2 in. wide from each set
-lay out one strip from each set as shown
-sew the remaining sets of strips together for binding, keeping pattern (stripe, check, print)
-cut into 2-1/2 in. strips and join to form binding
-press all seams open

-sew a 2-1/2 in. background square diagonally to the bottom left and top right print squares
-trim leaving a 1/4 in. seam allowance and press open with seam toward background
-sew strips together and press seams in the same direction
-make 3 more hearts
-using a transparent ruler trim off tops of squares leaving a 1/4 in. seam allowance above tops of check squares
-cut 7 in. background squares in half diagonally
-sew a half triangle across the top of each heart block
-press open with seam toward background fabric


-trim edges to measure 10-1/2 in. square
-lay out heart squares and join pairs with 10-1/2 in. background strips
-press seams toward strips
-take a square from the binding strip and press it flat (there are more than needed for the binding)
-sew ends of 10-1/2 in. background strips to opposite sides of the square and press seams toward the square
-sew pairs of heart squares to the background strips with the square in the centre
-press seams toward strips
-sew 22-1/2 in. strips to sides of block and press seams toward strips
-sew 26-1/2 in. strips to top and bottom of block and press seams toward strips
-layer top, batting and backing fabric together and pin through all layers
-quilt diagonally across top
-trim edges to square
-press binding strip in half lengthwise
-finish edges with binding strip as shown for the pot holder in this post

Friday, September 7, 2012

Piercing Techniques: String Art

Use your piercing templates to create a string art design and running stitch. 
-adhere 1-3/8 in. card stock circle to a card stock flower
-position the piercing template over the card stock
-pierce every other hole outside the card stock circle
-thread a needle with linen thread
-adhere end to back of card stock and bring thread to front
-pass thread to back through 7th hole from beginning
-bring thread to front through the next hole to the right
-pass thread to back beside first hole
-continue sewing through holes
-add a button to the thread and continue the design
-snip thread and secure end to back of card stock
-use a curved line from the template to pierce the stem on the mat
-sew a running stitch through the holes
-secure ends to back of mat


Supplies
Stamps
-Word Play 120308
Ink
-Chocolate Chip pad 126979
Paper
-Crumb Cake card stock 120953
-Pool Party card stock 122924
-Island Indigo card stock 122923
-Chocolate Chip card stock 102128
Tools
-Big Shot 113439
-Fun Flowers die 121812
-1-3/8 in. circle punch 119860
-Paper-piercing tool 126189
-Stampin' Pierce mat 126199
-Essentials Paper-piercing pack 126187
-needle
Accessories
-Linen thread 104199
-Bitty Buttons 118761
-Glue Dots 103683
-Stampin' Dimensionals 104430

Here's an older String Art sample with beads on the thread. Most of the products are discontinued, but I wanted to include it for inspiration.

Friday, August 31, 2012

Piercing Techniques: Faux Stitching

Use the grid template from the Essential Piercing Pack to pierce rows of holes. Then, connect the holes with a marker or gel pen to imitate stitching.

The pocket tag is Stampin' Up! cotton ribbon stamped with a sentiment.

I slid a stamped sentiment into the pocket, but tickets or money would be just as welcome.

-mark a 3 in. X 3 in. piece of card stock as shown
-cut on the lines
-use Essentials piercing pack grid to pierce edges
-use Festive piercing pack to pierce the pocket design
-connect the holes with a fine tip marker to imitate stitching
-apply ink to the card stock with a sponge dauber to imitate denim


Supplies
Stamps
-Word Play 120308
-Hoop La La 126250
Ink
-Midnight Muse pad 126860
-Cajun Craze pad 126965
-More Mustard marker
Paper
-Marina Mist card stock119682
-More Mustard card stock 100946
-Cajun Craze card stock 119684
Tools
-sponge dauber 102892
-Stampin' Pierce mat 126199
-Paper-piercing tool 126189
-Essentials Paper-piercing pack 126187
-Festive Paper-piercing pack 127857
-1/2 in. Circle punch
Accessories
-Metallic brads 119741
-7/8 in. Cotton ribbon 127844


Friday, August 24, 2012

Piercing Techniques: Grid Template


The Grid Template in the Essentials Paper-Piercing pack can be used to pierce perfectly placed holes on any line.

I made a card stock template, but if you plan to use the template several times, a plastic Window Sheet template would be more durable.


-stamp an image on scrap card stock
-place the stamped card stock on the Stampin' Pierce Mat
-position a hole of the Grid Template directly over a line in the image
-pierce the hole and keep the piercing tool in the hole
-turn the grid to position the next hole over the line in the image
-pierce hole and keep the piercing tool in the hole

-turn the grid to position the next hole over the line in the image
-pierce the hole and keep the piercing tool in the hole
-continue to turn and pierce the Grid Template on the image


Stamps
-Everything Eleanor 124162
-Loving Thoughts 125843
Ink
-Chocolate Chip 126979
-Baja Breeze 126960
Paper
-Crumb Cake 120953
-Chocolate Chip 102128
-Baja Breeze 111352
-Naturals Ivory 101849
Tools
-Stampin' Pierce Mat 126199
-Paper Piercing Tool 126189
-Essentials Paper-Piercing Pack 126187
-Large Oval punch 119855
-Big Shot 113439
-Apothecary Accents Framelits 127003
Accessories
-Linen thread 104199
-Antique brads 117273

Friday, August 17, 2012

Piercing Techniques: Templates

Piercing adds interest to paper crafts. And, it's so easy with Stampin' Up! templates to match our Framelits, Edgelits and punches.

For the pierced scallop edge and heart I used the Essentials Paper-Piercing Pack.

There are so many more templates to choose from in the Annual catalogue and the Holiday catalogue. Check them out from the links in the column!

-cut the scallop edge with the Big Shot and the Large Scallop Edgelits
-place the card stock on the Stampin' Pierce mat
-position the template over the card stock and pierce the edge


Supplies
Stamps
-You Are Loved 123777
-Love Blossoms wheel 123839
Ink
-Basic Black pad 126980
Paper
-Basic Gray card stock 121044
-Pink Pirouette card stock 111351
-Whisper White card stock 100730
-Basic Black card stock 121045
-Silver glimmer paper 124005
-Vellum card stock 101856
Tools
-Paper-Piercing Tool 126189
-Stampin' Pierce Mat 126199
-Essentials Paper Piercing Pack 126187
-Big Shot 113439
-Large Scallop Edgelits 127019
-Large Oval punch 119855
-Scallop Oval punch 119856
-Elegant Butterfly punch 127526
Accessories
-Basic Rhinestones 119246