Rainbow Embossing Powder
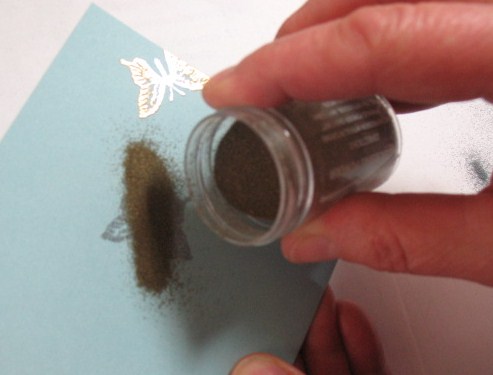
You can use different colours of EP on one image to create a rainbow effect.
I used Smooch Spritz to emphasize the "fairytale" theme.
On this blog, I usually use Stampin' Up! products exclusively for my samples, so I'm confined to a small selection of EP colours.
Do try this with more than 2 colours!
Swipe the card stock with an Embossing Buddy to keep stray specks of EP to a minimum.
Stamp an image with a VersaMark pad. Hold the card stock at an angle and pour a colour of EP on a section of the image. Tip the card stock to pour off the excess powder. Turn the card stock and add EP to another section of the image and remove the excess powder.
Once the EP has adhered to a section of the image, it will resist any more powder so you can safely add another colour by overlapping the application. Pour off the excess powder. Check for stray specks of EP and remove with a fine paint brush.
Use the heat tool to melt the powders and let cool.
Supplies
Stamps
-Full of Life 111550 IBC p. 152
-Dreams du Jour 111624 IBC p. 101
Ink
-VersaMark pad 102283 IBC p. 195
Paper IBC pp. 165-170
-Baja Breeze card stock
-Brushed Gold card stock
-Whisper White card stock
Tools
-Heat Tool 100005 IBC p. 196
-1/16 in. hand punch 101227 IBC p. 202
-Embossing Buddy 103083 IBC p. 196
Accessories
-Gold EP 109129 IBC p. 196
-Silver EP 109131 IBC. 196
-Square Ice Rhinestone brads 109113 IBC p. 187
-Whisper White 1/8 in. taffeta ribbon 119262 IBC p. 191
-Vanilla Shimmer Smooch Spritz 118772 IBC p. 195
Showing posts with label embossing powder. Show all posts
Sunday, February 27, 2011
Tuesday, February 22, 2011
Embossing Powder Techniques #12
Faux Mosaic Resist

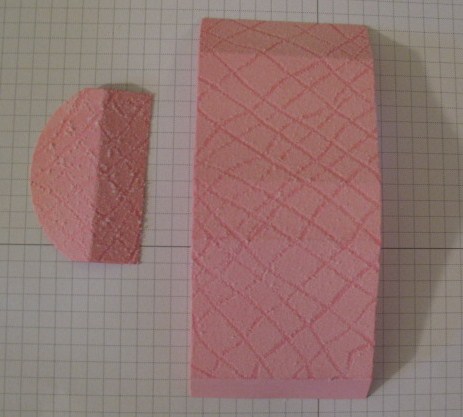
Stampin' Up! stamp sets are die cut when you receive them. After you mount your stamps, save the foam backed adhesive rubber to make a Mosaic stamp. Cut the flat rubber into "shards" and adhere them to a suitable block leaving some space between the pieces. Use this stamp to turn any image into a mosaic without cutting.
I stamped the rose on white card stock with Jet Black StazOn ink and used markers and a blender pen to colour the image. Let the inks dry completely; you can speed the drying with a Heat Tool.
Swipe the card stock with an Embossing Buddy and stamp your Mosaic stamp with a VersaMark pad. Apply Clear EP, shake off the excess and melt with a Heat Tool.
When the EP is cooled, swipe the piece with a black ink pad, NOT StazOn, working the ink into the "cracks". Then, clean the ink from the EP with a tissue.
Supplies
Stamps
-Happiness Shared 117038 IBC p. 100
-Mosiac stamp (see instructions)
Ink IBC pp. 165-169
-VersaMark pad 102283 IBC p. 195
-Old Olive ink pad
-Basic Black ink pad
-Pretty in Pink ink pad
-Jet Black StazOn pad 101406 IBC p. 195
-Pink Pirouette marker
-River Rock marker
-So Saffron marker
Paper IBC pp. 165-170
-Whisper White card stock
-Basic Black card stock
-Pink Pirouette card stock
-River Rock card stock
Tools
-1/16 in. hand punch 101227 IBC p. 202
-Dotted Scallop Ribbon Border punch 119275 IBC p. 201
-Heat Tool 100005 IBC p. 196
-Embossing Buddy 103083 IBC p. 196
Accessories
-Clear EP 109130 IBC p. 196
-Clear Rhinestone brad 113144 IBC p. 187
-Black Satin Ribbon 117285 IBC p. 191
Previously, in Heat Embossing Techniques #3, I showed you a similar technique. This one is a lot faster to make, but first you have to make a Mosaic stamp. Here's how.
Stampin' Up! stamp sets are die cut when you receive them. After you mount your stamps, save the foam backed adhesive rubber to make a Mosaic stamp. Cut the flat rubber into "shards" and adhere them to a suitable block leaving some space between the pieces. Use this stamp to turn any image into a mosaic without cutting.
I stamped the rose on white card stock with Jet Black StazOn ink and used markers and a blender pen to colour the image. Let the inks dry completely; you can speed the drying with a Heat Tool.
Swipe the card stock with an Embossing Buddy and stamp your Mosaic stamp with a VersaMark pad. Apply Clear EP, shake off the excess and melt with a Heat Tool.
When the EP is cooled, swipe the piece with a black ink pad, NOT StazOn, working the ink into the "cracks". Then, clean the ink from the EP with a tissue.
Supplies
Stamps
-Happiness Shared 117038 IBC p. 100
-Mosiac stamp (see instructions)
Ink IBC pp. 165-169
-VersaMark pad 102283 IBC p. 195
-Old Olive ink pad
-Basic Black ink pad
-Pretty in Pink ink pad
-Jet Black StazOn pad 101406 IBC p. 195
-Pink Pirouette marker
-River Rock marker
-So Saffron marker
Paper IBC pp. 165-170
-Whisper White card stock
-Basic Black card stock
-Pink Pirouette card stock
-River Rock card stock
Tools
-1/16 in. hand punch 101227 IBC p. 202
-Dotted Scallop Ribbon Border punch 119275 IBC p. 201
-Heat Tool 100005 IBC p. 196
-Embossing Buddy 103083 IBC p. 196
Accessories
-Clear EP 109130 IBC p. 196
-Clear Rhinestone brad 113144 IBC p. 187
-Black Satin Ribbon 117285 IBC p. 191
Friday, February 18, 2011
Embossing Powder Techniques #11
Joseph's Coat Resist
When creating this subtly layered effect, choose closely related colour combinations to avoid a muddy appearance.
I stamped the butterflies with So Saffron ink close together on White card stock. Using the leaf stem, I stamped with Baja Breeze and Marina Mist, overlapping the images. Then, I used a sponge dauber to fill in most of the remaining white space with Bashful Blue ink. Make sure to let the inks dry or use a heat tool to speed the process.
Swipe the card stock with an Embossing Buddy and stamp the butterflies, spaced widely, with VersaMark. Cover with Clear EP, shake off the excess and melt with the heat tool. Let cool.
Using sponge daubers I coloured in the background with patches of Baja Breeze, Marina Mist and Not Quite Navy ink. Finally, I stamped the leaf stem with Not Quite Navy and set the card stock aside to dry. Don't use a heat tool to speed the drying at this point or the inks will mix with the embossing powder when it melts. You want the EP to stay clear.
When the card stock is dry, use a tissue to remove the inks from the heat embossed butterflies to reveal the lighter colours beneath.
Supplies
Stamps
-Great Friend 113792 IBC p. 122
Ink IBC pp. 165-169
-So Saffron pad
-Baja Breeze pad
-Marina Mist pad
-Bashful Blue pad
-Not Quite Navy pad
-Certainly Celery pad
-VersaMark pad 102283 IBC p. 195
Paper IBC pp. 165-170
-So Saffron card stock
-Whisper White card stock
-Certainly Celery card stock
-Not Quite Navy card stock
Tools
-Big Shot 113439 IBC p. 204
-Matchbox die 114890 IBC p. 204
-Heat Tool 100005 IBC p. 196
-Embossing Buddy 103083 IBC p. 196
-sponge daubers 102892 IBC p. 195
Accessories
-Clear embossing powder 109130 IBC p. 196
-Daffodil Delight taffeta ribbon 119766 IBC p. 191
-Subtles flower brads 119732 IBC p. 187
When creating this subtly layered effect, choose closely related colour combinations to avoid a muddy appearance.
I stamped the butterflies with So Saffron ink close together on White card stock. Using the leaf stem, I stamped with Baja Breeze and Marina Mist, overlapping the images. Then, I used a sponge dauber to fill in most of the remaining white space with Bashful Blue ink. Make sure to let the inks dry or use a heat tool to speed the process.
Swipe the card stock with an Embossing Buddy and stamp the butterflies, spaced widely, with VersaMark. Cover with Clear EP, shake off the excess and melt with the heat tool. Let cool.
Using sponge daubers I coloured in the background with patches of Baja Breeze, Marina Mist and Not Quite Navy ink. Finally, I stamped the leaf stem with Not Quite Navy and set the card stock aside to dry. Don't use a heat tool to speed the drying at this point or the inks will mix with the embossing powder when it melts. You want the EP to stay clear.
When the card stock is dry, use a tissue to remove the inks from the heat embossed butterflies to reveal the lighter colours beneath.
Supplies
Stamps
-Great Friend 113792 IBC p. 122
Ink IBC pp. 165-169
-So Saffron pad
-Baja Breeze pad
-Marina Mist pad
-Bashful Blue pad
-Not Quite Navy pad
-Certainly Celery pad
-VersaMark pad 102283 IBC p. 195
Paper IBC pp. 165-170
-So Saffron card stock
-Whisper White card stock
-Certainly Celery card stock
-Not Quite Navy card stock
Tools
-Big Shot 113439 IBC p. 204
-Matchbox die 114890 IBC p. 204
-Heat Tool 100005 IBC p. 196
-Embossing Buddy 103083 IBC p. 196
-sponge daubers 102892 IBC p. 195
Accessories
-Clear embossing powder 109130 IBC p. 196
-Daffodil Delight taffeta ribbon 119766 IBC p. 191
-Subtles flower brads 119732 IBC p. 187
Sunday, January 23, 2011
Embossing Powder Techniques #9
Iridescent Ice Embossing Powder
Stampin' Up! Iridescent Ice EP is clear with glitter. Use it with VersaMark if you want it to stay transparent, allowing images to show through or stamp with any colour of Craft (pigment) ink to add glitter to the colour.
Sparkle can transform a simple card into an elegant one. Use it to imitate sugar on images of baked goods, frost on winter images and conjure magic when applied to wings or nature images.
The sparkle doesn't show up very well in my photo, but you can see enough to get the idea.
I used a Whisper White Craft pad to stamp the background image, then covered it with Iridescent Ice embossing powder. Shake off the excess and heat until melted. Be careful not to over heat or it will turn dull. After it cooled I added the rhinestone embellishments.
The sentiment was stamped on Whisper White card stock with Night of Navy ink. Then I punched out the shape and covered it with a VersaMark pad. Next, cover it with Iridescent Ice EP, shake off the excess and heat.
Supplies
Stamps
-Wedding Sweet 115466 IBC p. 67
Ink IBC pp. 165-169
-Whisper White Craft Stampin' Pad 101731
-Night of Navy Classic Stampin' pad 102977
-VersaMark pad 102283 IBC p. 195
Paper IBC pp. 165-170
-Night of Navy card stock
-Whisper White card stock
Tools
-Modern Label punch 119849 IBC p. 203
-Heat Tool 100005 IBC p. 196
Accessories
-Night of Navy 1/8 in. taffeta ribbon 119258 IBC p. 191
-Iridescent Ice embossing powder 101930 IBC p. 196
-Basic Rhinestones 119246 IBC p. 188
Again, it's hard to see the sparkle on this sample.
The sentiment was stamped with a Chocolate Chip Craft ink and heat embossed with Iridescent Ice embossing powder. I use the refill bottles and a sponge dauber to apply the ink to the stamp.
I punched the heart from card stock and covered the surface with a VersaMark pad. Then I added Iridescent Ice EP, poured off the excess and heated it. To avoid burning my fingers when heating a small item, I attach the end of a strip of scrap card stock to the back for a handle and remove it after the shape has cooled.
The cakes were stamped with Black StazOn ink and coloured with a blender pen and inks picked up from the lids of my stamp pads. Once dry, I touched up the icing with a VersaMarker. It's the same stuff that's in the VersaMark pad, but it's a marker. Very handy! Then I added Iridescent Ice EP, shook off the excess and heated it.
Supplies
Stamps
-Birthday Bakery Hostess set IBC p. 10
-A Word for You 117032 IBC p. 158
Ink IBC pp. 165-169
-Chocolate Chip Craft Stampin' refill 102847 IBC
-Jet Black StazOn ink pad 101406 IBC p. 195
-VersaMark pad 102283 IBC p. 195
-VersaMarker 100901 IBC p. 195
-Chocolate Chip Classic ink
-Real Red Classic ink
-Tempting Turquoise Classic ink
-Certainly Celery Classic ink
-Rose Red Classic ink
-Daffodil Delight Classic ink
Paper IBC pp. 165-170
-Certainly Celery card stock
-Pretty in Pink card stock
-Chocolate Chip card stock
-Whisper White card stock
-Melon Mambo card stock
-Wild Wasabi card stock
Tools
-Dotted Scallop Ribbon Border punch 119275 IBC p. 201
-Scallop Trim Border punch 118402 IBC p. 201
-Scallop Edge Border punch 119882 IBC p. 201
-Oval punch 119863 IBC p. 203
-Small Heart punch 117193 IBC p. 202
Accessories
-Melon Mambo pompom trim 123322 OMC p. 35
-Iridescent Ice embossing powder 101930 IBC p. 196
Stampin' Up! Iridescent Ice EP is clear with glitter. Use it with VersaMark if you want it to stay transparent, allowing images to show through or stamp with any colour of Craft (pigment) ink to add glitter to the colour.
Sparkle can transform a simple card into an elegant one. Use it to imitate sugar on images of baked goods, frost on winter images and conjure magic when applied to wings or nature images.
The sparkle doesn't show up very well in my photo, but you can see enough to get the idea.
I used a Whisper White Craft pad to stamp the background image, then covered it with Iridescent Ice embossing powder. Shake off the excess and heat until melted. Be careful not to over heat or it will turn dull. After it cooled I added the rhinestone embellishments.
The sentiment was stamped on Whisper White card stock with Night of Navy ink. Then I punched out the shape and covered it with a VersaMark pad. Next, cover it with Iridescent Ice EP, shake off the excess and heat.
Supplies
Stamps
-Wedding Sweet 115466 IBC p. 67
Ink IBC pp. 165-169
-Whisper White Craft Stampin' Pad 101731
-Night of Navy Classic Stampin' pad 102977
-VersaMark pad 102283 IBC p. 195
Paper IBC pp. 165-170
-Night of Navy card stock
-Whisper White card stock
Tools
-Modern Label punch 119849 IBC p. 203
-Heat Tool 100005 IBC p. 196
Accessories
-Night of Navy 1/8 in. taffeta ribbon 119258 IBC p. 191
-Iridescent Ice embossing powder 101930 IBC p. 196
-Basic Rhinestones 119246 IBC p. 188
Again, it's hard to see the sparkle on this sample.
The sentiment was stamped with a Chocolate Chip Craft ink and heat embossed with Iridescent Ice embossing powder. I use the refill bottles and a sponge dauber to apply the ink to the stamp.
I punched the heart from card stock and covered the surface with a VersaMark pad. Then I added Iridescent Ice EP, poured off the excess and heated it. To avoid burning my fingers when heating a small item, I attach the end of a strip of scrap card stock to the back for a handle and remove it after the shape has cooled.
The cakes were stamped with Black StazOn ink and coloured with a blender pen and inks picked up from the lids of my stamp pads. Once dry, I touched up the icing with a VersaMarker. It's the same stuff that's in the VersaMark pad, but it's a marker. Very handy! Then I added Iridescent Ice EP, shook off the excess and heated it.
Supplies
Stamps
-Birthday Bakery Hostess set IBC p. 10
-A Word for You 117032 IBC p. 158
Ink IBC pp. 165-169
-Chocolate Chip Craft Stampin' refill 102847 IBC
-Jet Black StazOn ink pad 101406 IBC p. 195
-VersaMark pad 102283 IBC p. 195
-VersaMarker 100901 IBC p. 195
-Chocolate Chip Classic ink
-Real Red Classic ink
-Tempting Turquoise Classic ink
-Certainly Celery Classic ink
-Rose Red Classic ink
-Daffodil Delight Classic ink
Paper IBC pp. 165-170
-Certainly Celery card stock
-Pretty in Pink card stock
-Chocolate Chip card stock
-Whisper White card stock
-Melon Mambo card stock
-Wild Wasabi card stock
Tools
-Heat Tool 100005 IBC p. 196
-Blender pen 102845 IBC p. 195-Dotted Scallop Ribbon Border punch 119275 IBC p. 201
-Scallop Trim Border punch 118402 IBC p. 201
-Scallop Edge Border punch 119882 IBC p. 201
-Oval punch 119863 IBC p. 203
-Small Heart punch 117193 IBC p. 202
Accessories
-Melon Mambo pompom trim 123322 OMC p. 35
-Iridescent Ice embossing powder 101930 IBC p. 196
Friday, December 31, 2010
Embossing Powder Techniques #7
Watercolour Inker Resist
In this technique a heat embossed image acts as a barrier for the water and ink.
Heat emboss an image on a card stock with a hard surface such as Stampin' Up! Shimmery White.
Spritz the card stock liberally with water and weight the corners to keep it from curling too much.
Pick up some ink on an Aqua Painter and touch it to the water. The ink will spread in the water. Let dry.
I used Clear EP for these flowers and cut them out after they dried.
Supplies
Stamps
-Fifth Avenue Floral 113734 IBC p. 122
-All Holidays 114916 IBC p. 154
Ink IBC pp. 165-169
-Pretty in Pink inker
-Regal Rose inker
-Bashful Blue inker
-Not Quite Navy inker
-Marina Mist ink pad
-Certainly Celery marker
Paper IBC pp. 165-170
-Shimmery White card stock
-Very Vanilla card stock
-Pink Pirouette card stock
-Marina Mist card stock
Tools
-Framed Tulips embossing folder 121809 OMC p. 28
-Big Shot 113439 IBC p. 204
-Heat Tool 100005 IBC p. 196
-Aqua Painter 103954 IBC p. 195
Accessories
-Clear embossing powder 109130 IBC p. 196
-Certainly Celery 3/8 in. taffeta ribbon
To custom colour the image I applied a VersaMark pad to the stamp, then pressed a Rose Red ink pad over it. Stamp and cover with Clear EP and heat with tool.
Supplies
Stamps
-Fifth Avenue Floral 113734 IBC p. 122
-Sincere Salutations 115068 IBC p. 155
Ink IBC pp. 165-169
-VersaMark pad 102283 IBC p. 195
-Rose Red pad and inker
-Pretty in Pink inker
-Basic Black pad
Paper IBC pp. 165-170
-Shimmery White card stock
-Rose Red card stock
-Whisper White card stock
-Basic Black card stock
Tools
-Clear embossing powder 109130 IBC p. 196
-Clear rhinestone brad 113144 IBC p. 187
-Basic Black 5/8 in. satin ribbon 117285 IBC p. 191
If you hate cutting out images as much as I do, try a layout with the image off the edge like the next 2 cards.
I used VersaMark and So Saffron ink with Clear EP for the outline.
Supplies
Stamps
-Aqua Painter 103954 IBC p. 195
-Heat Tool 100005 IBC p. 196
Accessories
-Pretty in Pink 1/8 in. taffeta ribbon 119260 IBC p. 191
-Clear embossing powder 109130 IBC p. 196
I used VersaMark and Not Quite Navy ink with Clear EP for the outline.
The yellow flower centres were coloured with a marker after the flowers had dried.
Supplies
Stamps
-Fifth Avenue Floral 113734 IBC p. 122
-Thoughtful Friend wheel 118616 IBC p. 219
Ink IBC pp. 165-169
-VersaMark pad 102283 IBC p. 195
-Not Quite Navy pad and inker
-Baja Breeze inker
-Daffodil Delight marker
Paper IBC pp. 165-170
-Shimmery White card stock
-Daffodil Delight card stock
-Not Quite Navy card stock
-Baja Breeze card stock
Tools
-Clear embossing powder 109130 IBC p. 196
-Daffodil Delight 1/8 in. taffeta ribbon 119254 IBC p. 191
On this card I just cut out the top edge of the flower because the ink bled onto the background.
The white taffeta ribbon was dyed by pressing it against an ink pad and pulling. I used Pretty in Pink and So Saffron on the sides and added a touch of Rose Red to the pink edge.
Supplies
Stamps
-Fifth Avenue Floral 113734 IBC p. 122
-Fabulous Phrases 117002 IBC p. 149
Ink IBC pp. 165-169
-VersaMark pad 102283 IBC p. 195
-Pretty in Pink pad
-So Saffron pad
-Rose Red pad and inker
-Regal Rose inker
-More Mustard inker
Paper IBC pp. 165-170
-Shimmery White card stock
-Blushing Bride card stock
-Very Vanilla card stock
-Rose Red card stock
Heat emboss an image on a card stock with a hard surface such as Stampin' Up! Shimmery White.
Spritz the card stock liberally with water and weight the corners to keep it from curling too much.
Pick up some ink on an Aqua Painter and touch it to the water. The ink will spread in the water. Let dry.
I used Clear EP for these flowers and cut them out after they dried.
Supplies
Stamps
-Fifth Avenue Floral 113734 IBC p. 122
-All Holidays 114916 IBC p. 154
Ink IBC pp. 165-169
-Pretty in Pink inker
-Regal Rose inker
-Bashful Blue inker
-Not Quite Navy inker
-Marina Mist ink pad
-Certainly Celery marker
Paper IBC pp. 165-170
-Shimmery White card stock
-Very Vanilla card stock
-Pink Pirouette card stock
-Marina Mist card stock
Tools
-Framed Tulips embossing folder 121809 OMC p. 28
-Big Shot 113439 IBC p. 204
-Heat Tool 100005 IBC p. 196
-Aqua Painter 103954 IBC p. 195
Accessories
-Clear embossing powder 109130 IBC p. 196
-Certainly Celery 3/8 in. taffeta ribbon
To custom colour the image I applied a VersaMark pad to the stamp, then pressed a Rose Red ink pad over it. Stamp and cover with Clear EP and heat with tool.
Supplies
Stamps
-Fifth Avenue Floral 113734 IBC p. 122
-Sincere Salutations 115068 IBC p. 155
Ink IBC pp. 165-169
-VersaMark pad 102283 IBC p. 195
-Rose Red pad and inker
-Pretty in Pink inker
-Basic Black pad
Paper IBC pp. 165-170
-Shimmery White card stock
-Rose Red card stock
-Whisper White card stock
-Basic Black card stock
Tools
-Big Shot 113439 IBC p. 204
-Manhattan Flower embossing folder IBC p. 214
-Heat Tool 100005 IBC p. 196
-Aqua Painter 103954 IBC p. 195
Accessories-Clear embossing powder 109130 IBC p. 196
-Clear rhinestone brad 113144 IBC p. 187
-Basic Black 5/8 in. satin ribbon 117285 IBC p. 191
If you hate cutting out images as much as I do, try a layout with the image off the edge like the next 2 cards.
I used VersaMark and So Saffron ink with Clear EP for the outline.
Supplies
Stamps
-Fifth Avenue Floral 113734 IBC p. 122
-Sincere Salutations 115068 IBC p. 155
Ink IBC pp. 165-169
-VersaMark pad 102283 IBC p. 195
-So Saffron pad
-Pretty in Pink pad
-More Mustard inker
-Regal Rose inker
Paper IBC pp. 165-170
-Shimmery White card stock
-So Saffron card stock
-Pretty in Pink card stock
-Pink Pirouette card stock
Tools-Aqua Painter 103954 IBC p. 195
-Heat Tool 100005 IBC p. 196
Accessories
-Pretty in Pink 1/8 in. taffeta ribbon 119260 IBC p. 191
-Clear embossing powder 109130 IBC p. 196
I used VersaMark and Not Quite Navy ink with Clear EP for the outline.
The yellow flower centres were coloured with a marker after the flowers had dried.
Supplies
Stamps
-Fifth Avenue Floral 113734 IBC p. 122
-Thoughtful Friend wheel 118616 IBC p. 219
Ink IBC pp. 165-169
-VersaMark pad 102283 IBC p. 195
-Not Quite Navy pad and inker
-Baja Breeze inker
-Daffodil Delight marker
Paper IBC pp. 165-170
-Shimmery White card stock
-Daffodil Delight card stock
-Not Quite Navy card stock
-Baja Breeze card stock
Tools
-Aqua Painter 103954 IBC p. 195
-Heat Tool 100005 IBC p. 196
Accessories-Clear embossing powder 109130 IBC p. 196
-Daffodil Delight 1/8 in. taffeta ribbon 119254 IBC p. 191
On this card I just cut out the top edge of the flower because the ink bled onto the background.
The white taffeta ribbon was dyed by pressing it against an ink pad and pulling. I used Pretty in Pink and So Saffron on the sides and added a touch of Rose Red to the pink edge.
Supplies
Stamps
-Fifth Avenue Floral 113734 IBC p. 122
-Fabulous Phrases 117002 IBC p. 149
Ink IBC pp. 165-169
-VersaMark pad 102283 IBC p. 195
-Pretty in Pink pad
-So Saffron pad
-Rose Red pad and inker
-Regal Rose inker
-More Mustard inker
Paper IBC pp. 165-170
-Shimmery White card stock
-Blushing Bride card stock
-Very Vanilla card stock
-Rose Red card stock
Tools
-Aqua Painter 103954 IBC p. 195
-Heat Tool 100005 IBC p. 196
Accessories
-Clear embossing powder 109130 IBC p. 196
-Whisper White 3/8 in. taffeta ribbon 109070 IBC p. 191
Sunday, December 19, 2010
Embossing Powder Techniques #6
Fossil Resist
After heat embossing an image you can apply techniques to the paper, but the embossed images will resist and stay the same.
For the Fossil Technique, start with card stock that has a hard surface and heat emboss images. I stamped snowflakes with VersaMark on Glossy White card stock and used Silver EP for this sample. You could also try Stampin' Up! Shimmery White, Brushed Gold and Brushed Silver card stock.
Moisten a cotton ball with rubbing alcohol and add some drops of re-inker. Now, dab the mixture onto the card stock and over the images. Let dry and wipe the embossed images with a tissue to remove the ink mixture.
Supplies
Stamps
-Serene Snowflakes 115438 IBC p. 42
-All Holidays 114916 IBC p. 154
Ink IBC pp. 165-169
-VersaMark pad 102283 IBC p. 195
-Not Quite Navy pad and re-inker
-Bashful Blue re-inker
Paper IBC pp. 165-170
-Bashful Blue card stock
-Whisper White card stock
-Glossy White card stock
Tools
-Heat Tool 100005 IBC p. 196
-Wide Oval punch 119859 IBC p. 203
Accessories
-cotton ball
-rubbing alcohol
-Whisper White 1/8 in. taffeta ribbon 119262 IBC p. 191
-Silver EP 109131 IBC p. 196
-Multipurpose glue 110755 IBC p. 197
-Silver Glass glitter 120995 HMC p. 21
After heat embossing an image you can apply techniques to the paper, but the embossed images will resist and stay the same.
For the Fossil Technique, start with card stock that has a hard surface and heat emboss images. I stamped snowflakes with VersaMark on Glossy White card stock and used Silver EP for this sample. You could also try Stampin' Up! Shimmery White, Brushed Gold and Brushed Silver card stock.
Moisten a cotton ball with rubbing alcohol and add some drops of re-inker. Now, dab the mixture onto the card stock and over the images. Let dry and wipe the embossed images with a tissue to remove the ink mixture.
Supplies
Stamps
-Serene Snowflakes 115438 IBC p. 42
-All Holidays 114916 IBC p. 154
Ink IBC pp. 165-169
-VersaMark pad 102283 IBC p. 195
-Not Quite Navy pad and re-inker
-Bashful Blue re-inker
Paper IBC pp. 165-170
-Bashful Blue card stock
-Whisper White card stock
-Glossy White card stock
Tools
-Heat Tool 100005 IBC p. 196
-Wide Oval punch 119859 IBC p. 203
Accessories
-cotton ball
-rubbing alcohol
-Whisper White 1/8 in. taffeta ribbon 119262 IBC p. 191
-Silver EP 109131 IBC p. 196
-Multipurpose glue 110755 IBC p. 197
-Silver Glass glitter 120995 HMC p. 21
Tuesday, December 14, 2010
Embossing Powder Techniques #5
Gold Embossing Powder
Chris Smith originally submitted this card on www.splitcoaststampers.com and I used it in a club last year.
I added a folded vellum sheet to the inside; held in place by gold cord through 1/16 in. punched holes in the spine.
The gold embossing powder adds elegance to this simple design.
Supplies
Stamps
-Fifth Avenue Floral 113734 IBC p. 122
-Sincere Salutations 115 068 IBC p. 155
Ink
-VersaMark pad 102283
Paper IBC pp. 165-170
-Chocolate Chip card stock
-Whisper White card stock
-Brushed Gold card stock
-Vellum card stock
Accessories
-Gold embossing powder 109129 IBC p. 196
-gold cord
Tools
-Heat Tool 100005 IBC p. 196
-1/16 in. punch 101227 IBC p. 202
Chris Smith originally submitted this card on www.splitcoaststampers.com and I used it in a club last year.
I added a folded vellum sheet to the inside; held in place by gold cord through 1/16 in. punched holes in the spine.
The gold embossing powder adds elegance to this simple design.
Supplies
Stamps
-Fifth Avenue Floral 113734 IBC p. 122
-Sincere Salutations 115 068 IBC p. 155
Ink
-VersaMark pad 102283
Paper IBC pp. 165-170
-Chocolate Chip card stock
-Whisper White card stock
-Brushed Gold card stock
-Vellum card stock
Accessories
-Gold embossing powder 109129 IBC p. 196
-gold cord
Tools
-Heat Tool 100005 IBC p. 196
-1/16 in. punch 101227 IBC p. 202
Sunday, November 21, 2010
Embossing Powder Techniques #4
Embossing Powder Colours
Coloured Opaque Embossing Powder
Because heat embossed images are glossy, I usually use the technique on more contemporary cards. Unfortunately, this photo doesn't show how glossy the black embossed image is.
I stamped the background flowers on paper with water-based ink and let it dry. Then, I swiped the surface with an Embossing Buddy. It's a little bag with powder (I think it's zinc) that keeps the embossing powder from sticking to the surface.
Next, I stamped the flowers with a VersaMark pad. It's a clear sticky medium that holds the embossing powder really well. I poured Black embossing powder over the image and shook off the excess. Lastly, I used a heat tool to melt the powder.
Supplies
Stamps
-Upsy Daisy 111710 IBC p. 112
-Heard from the Heart 111644 IBC p. 156
Ink IBC pp. 165-169
-Melon Mambo pad
-Basic Black pad
-VersaMark pad 102283 IBC p. 195
Paper IBC pp. 165-170
-Regal Rose card stock
-Melon Mambo card stock
-Regal Rose DSP
Tools
-Heat Tool 100005 IBC p. 196
-Embossing Buddy 103083 IBC p. 196
Accessories
-Black embossing powder 109133 IBC p. 196
-Black 1/4 in. ribbon 109027 IBC p. 191
-Basic Rhinestones 119246 IBC p. 188
Custom Coloured Embossing Powder
Stampin' Up! Craft Pigment ink comes in 40 colours. It's a VERY slow-drying opague ink with the ability to hold embossing powder so you can customize your heat embossing to match our Designer Papers and Card Stock.
To prepare your card stock for heat embossing swipe it with an Embossing Buddy.
I stamped the flowers with Craft inks, then covered the mat with Clear embossing powder. Shake off the excess powder and melt the powder with a heat tool.
Again, the glossy appearance of the images isn't visible in this photograph.
Supplies
Stamps
-Fifth Avenue Floral 113734 IBC p. 122
Ink IBC pp. 165-169
-Bashful Blue Craft ink
-Certainly Celery Craft ink
-Chocolate Chip Craft ink
-Chocolate Chip pad
Paper IBC pp. 165-169
-Bashful Blue card stock
-Very Vanilla card stock
-Chocolate Chip card stock
Tools
-Heat Tool 100005 IBC p. 196
-Embossing Buddy 103083 IBC p. 196
Accessories
-Clear embossing powder 109130 IBC p. 196
-Hodgepodge Hardware ribbon slide 112454 IBC p. 188
-Early Espresso 1/4 in. ribbon 120931 IBC p. 191
Shop Now!
Tuesday, November 9, 2010
Embossing Powder Techniques #3
Mosaic
Embossing powder can be used as "grout" to imitate tile or tesserae on paper crafts.
The bubbles on the page are Vellum card stock. I just can't stop finding uses for vellum!
I adhered Sticky Page to a white card stock mat and arranged squares of card stock for tiles. Cover with White embossing powder and shake off the excess powder. Only the powder between the squares will remain. Melt the powder with a heat tool.
Next, I stamped on some of the squares and applied a VersaMark pad to the surface. Cover with Clear embossing powder, shake off the excess and melt the powder.
Supplies
Stamps
-Circle Circus115778 IBC p. 136
Ink IBC pp. 165-169
-Marina Mist
Paper IBC pp. 165-170
-Bashful Blue card stock
-Marina Mist card stock
-Whisper White card stock
-Vellum card stock
Tools
-heat tool 100005 IBC p. 196
-1 in. circle punch 119868 IBC p. 203
-1 1/4 in. circle punch 119861 IBC p. 203
-1 3/4 in. circle punch 119850 IBC p. 203
Accessories
-Sticky Page 114300 IBC p. 205
-White embossing powder 109132 IBC p. 196
-Clear embossing powder 109130 IBC p. 196
-VersaMark pad 102283 IBC p. 195
For this card I stamped and coloured white card stock with images that reminded me of blue and white china and cut them into shards.
Adhere Sticky Page to a white card stock mat and arrange the shards on the top sticky side. Add white embossing powder, shake off the excess and melt the powder between the tesserae with a heat tool. Let cool.
Apply VersaMark pad to the entire design and cover with clear embossing powder, shake off the excess and melt with heat tool.
Supplies
Stamps
-Elements of Style 118611 IBC p. 133
-Bella Toile 111598 IBC p. 142
-Elizabeth 117120 IBC p. 18
-Vintage Vogue 117690 IBC p. 126
-Charming 116519 IBC p. 130
-Perfect Punches 117022 IBC p. 131
Ink IBC pp. 165-169
-Not Quite Navy
-Pacific Point
-Marina Mist
-Baja Breeze
-Bashful Blue
Paper IBC pp. 165-170
-Marina Mist card stock
-Pacific Point card stock
-Bashful Blue card stock and DSP
-Whisper White card stock
Tools
-heat tool 100005 IBC p. 196
-Oval punch 119855 IBC p. 202
-Scallop Oval punch 119856 IBC p. 201
-Blender Pen 102845 IBC p. 195
Accessories
-Sticky Page 114300 IBC p. 205
-White embossing powder 109132 IBC p. 196
-Clear embossing powder 109130 IBC p. 196
-VersaMark pad 102283 IBC p. 195
-Organza ribbon 114319 IBC p. 190
Tuesday, November 2, 2010
Embossing Powder Techniques #2
Faux Metal
To make the faux metal embellishments on the following projects, I covered a scrap of card stock with a VersaMark pad and added metallic embossing powder. Melt the embossing powder with a heat tool and let cool slightly before repeating the layers of Versamark and embossing powder twice more.
After heating the last time, press a stamp into the soft EP and hold until cooled. Remove from the stamp and use a punch to cut out the desired shape.
Inked Faux Reptile
To create a natural looking faux reptile effect on this gift card, I used sponge daubers with River Rock and Soft Suede inks on Crumb Cake card stock before applying a VersaMark pad to the surface. Pour on clear embossing powder and shake off the excess. Use a bone folder to draw uneven lines and melt with a heat tool.
Use the faux metal technique described above to make the designer label.
Supplies
Stamps
-Perfect Punches 117022 IBC p. 131
Ink IBC pp. 165-169
-River Rock
-Soft Suede
-VersaMark pad 102283 IBC p. 195
Paper IBC pp. 165-170
-Crumb Cake card stock
-Brushed Gold card stock
Tools
-Bone Folder 102300 IBC p. 198
-Modern Label punch 119849 IBC p. 203
-1 3/8 in. Circle punch 119860 IBC p. 203
-Sponge Daubers 102892 IBC p. 195
-Heat Tool 100005 IBC p. 196
Accessories
-Clear embossing powder 109130 IBC p. 196
-Gold embossing powder 109129 IBC p. 196
I used UTEE (Ultra Thick Embossing Enamel) instead of regular embossing powder for a really bumpy faux reptile texture on this purse shaped card.
Use the faux metal technique for the clasp and punched circles of magnetic vinyl to hold it closed.
Supplies
Stamps
-Charming 116519 IBC p. 130
Ink
-VersaMark pad 102283 IBC p. 195
Paper IBC pp. 165-170
-Real Red card stock
-Brushed Silver card stock
Tools
-Bone Folder 102300 IBC p. 198
-Heat Tool 100005 IBC p. p.196
-1 1/4 in. Circle punch 119861 IBC p. 203
-Big Shot 113439 IBC p. 204
-Top Note Bigz die 113463 IBC p. 207
Accessories
-UTEE
-Silver elastic cord
-Silver embossing powder 109131 IBC p. 196
Sunday, October 31, 2010
Embossing Powder Techniques #1
Faux Reptile Purse Favours
This cute favour box was cut out with the Big Shot and Stampin' Up!'s exclusive Matchbox die.
I was inspired by Francine Yee's Pumpkin Pie sample to make the others.
Punch a hole in the side of the box and insert the ribbon. I used glue dots to secure it. Then assemble the box.
Fold the slipcase and the flap on all the score lines. Apply a VersaMark pad to both pieces, except for the small tab section. Pour Clear EP (embossing powder) onto the card stock and shake off the excess. Draw a bone folder across the surfaces in uneven lines
Use a heat tool to melt EP until it is shiny and let cool.
Punch a hole in the flap and insert a brad. Assemble the slipcase and adhere the flap. Stick the brad to the case with a glue dot.
Supplies
Ink
-VersaMark pad 102283 IBC p. 195
Paper IBC pp. 165-170
-Pretty in Pink card stock
-Pumpkin Pie card stock
-Basic Black card stock
Tools
-Heat Tool 100005 IBC p. 196
-Bone Folder 102300 IBC p. 198
-Corner Rounder punch 119871 IBC p. 201
-2 in. Circle punch
-hole punch
Accessories
-Clear embossing powder 109130 IBC p. 196
-1/4 in. Pretty in Pink grosgrain ribbon 109032 IBC p. 191
-1/4 in. Pumpkin Pie grosgrain ribbon 109030 IBC p. 191
-1/4 in. Basic Black grosgrain ribbon 109027 IBC p. 191
-Clear Rhinestone brad 113144 IBC p. 187
-Brights Flower brad 119734 IBC p. 187
-Filigree brad 112577 IBC p. 187
-Sticky Strip 104294 IBC p. 197
Shop Now!
This cute favour box was cut out with the Big Shot and Stampin' Up!'s exclusive Matchbox die.
I was inspired by Francine Yee's Pumpkin Pie sample to make the others.
Punch a hole in the side of the box and insert the ribbon. I used glue dots to secure it. Then assemble the box.
Fold the slipcase and the flap on all the score lines. Apply a VersaMark pad to both pieces, except for the small tab section. Pour Clear EP (embossing powder) onto the card stock and shake off the excess. Draw a bone folder across the surfaces in uneven lines
Use a heat tool to melt EP until it is shiny and let cool.
Punch a hole in the flap and insert a brad. Assemble the slipcase and adhere the flap. Stick the brad to the case with a glue dot.
Supplies
Ink
-VersaMark pad 102283 IBC p. 195
Paper IBC pp. 165-170
-Pretty in Pink card stock
-Pumpkin Pie card stock
-Basic Black card stock
Tools
-Heat Tool 100005 IBC p. 196
-Bone Folder 102300 IBC p. 198
-Corner Rounder punch 119871 IBC p. 201
-2 in. Circle punch
-hole punch
Accessories
-Clear embossing powder 109130 IBC p. 196
-1/4 in. Pretty in Pink grosgrain ribbon 109032 IBC p. 191
-1/4 in. Pumpkin Pie grosgrain ribbon 109030 IBC p. 191
-1/4 in. Basic Black grosgrain ribbon 109027 IBC p. 191
-Clear Rhinestone brad 113144 IBC p. 187
-Brights Flower brad 119734 IBC p. 187
-Filigree brad 112577 IBC p. 187
-Sticky Strip 104294 IBC p. 197
Shop Now!
Subscribe to:
Posts (Atom)