Friday, March 2, 2012

Pastel Techniques: VersaMark Pad

Create a soft, chalky image with pastels. Stamp the image with VersaMark and apply the pastels blending colours as desired. I like to leave a little pastel on the card stock around the images, but you can remove the excess with the eraser from the kit.

My first purchase from Stampin' Up! was the pastels and a VersaMark pad because I got all the colours at once!

I scored a 1/2 in. border on the card front with the Simply Scored tool.


 VersaMark is a clear adhesive in a pad. It's hard to see the stamped image.
 I use cotton swabs to apply pastels to the image when I want to avoid some parts of the image. I'm using Perfect Plum on the flower.
 Apply Elegant Eggplant to the centre of the flower.
 Apply River Rock and Certainly Celery to the foliage.
Brush some of the chalk off with a cotton ball.


Supplies
Stamps
-Love and Sympathy 122795
Ink
-VersaMark pad 102283
-Elegant Eggplant pad 105210
Paper
-Confetti Cream card stock 102835
Tools
-Simply Scored tool 122334
Accessories
-Stampin' Pastels 120962

Tuesday, February 28, 2012

Quilted Potholders: Strip Piecing

I know, I know! This is a stamping blog. But, since Stampin' Up! introduced Designer Fabric I've been learning to quilt and I want to share. I hope you'll give my simple potholder tutorials a try.

The first two projects are strip-pieced. It's so easy!

Log Cabin Block
I used Flirtatious 122335 and Springtime Vintage 121817 fabrics.
Cut 2-1/2 in. wide strips and sub-cut them into these lengths:
Springtime Vintage large floral (1) 2-1/2 in. square
Flirtatious pink doilies (1) 2-1/2 in. square and (1) 4-1/2 in. strip
Flirtatious lavender doilies (1) 4-1/2 in. strip and (1) 6-1/2 in. strip
Springtime Vintage small floral (1) 6-1/2 in. strip (1) 8-1/2 in. strip
Springtime Vintage blue print (1) 8-1/2 in. strip (1) 10-1/2 in. strip


All seam allowances are a scant 1/4 in. unless otherwise stated. Sew the squares together and press the seam toward the doily fabric.
Sew the next strip to the first section and press the seam toward the new strip.
Sew the next strip and press the seam toward the new strip.
Continue sewing and pressing the strips.
Trim the edges of the finished block.
Layer the pieced block over batting and backing fabric. Pin and sew through all layers. I stitched 1/4 in. inside and outside the squares with pink thread.

Add a heat resistant fabric layer to the bottom if desired and trim the edges.
Cut (3) 2-1/2 in. X 18 in. strips. Sew the strips into a continuous strip and press the seams open. Press in half lengthwise.
Match  raw edges of binding strip and quilted potholder. Start sewing 3/8 in. from the edge and about 4 in. from the end of the binding strip.
Stop 3/8 in. from the corner with needle down.
Lift presser foot, pivot fabric and lower presser foot.
Sew off the edge.

Fold binding strip over edge.


Fold binding strip down to turn corner.


Sew from edge to next corner and repeat steps for all corners.


After last corner overlap ends of binding strip and trim. Finger press 3/8 in. on end of strip.
Join binding strip and finish seam.
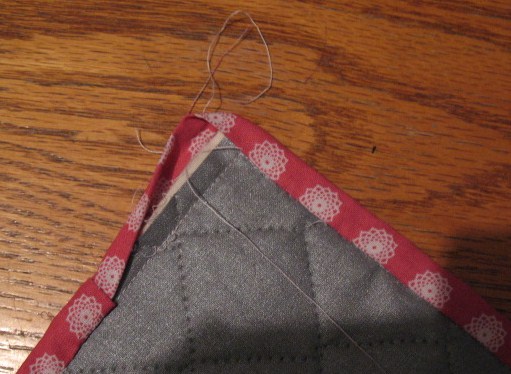
Hand sew binding to back of potholder. Form corners as shown.


Continue sewing binding. Add a hanger loop and a button if desired.


Nine Patch Block
I used Beau Chateau fabric 122336.

 Cut (3) 2-1/2 in. X 18 in. strips each from two fabrics.
Sew two sets of 3 strips with a scant 1/4 in. seam allowance alternating fabrics. (One light strip between two dark strips and one dark strip between two light strips.)
Press seams toward blue strips. Use a rotary cutter and straight edge to cut the sets into 2-1/2 in. sections. You should have 14 sets

 Sew Nine Patch block from sections. Press seams toward sides.
Sew remaining sections into alternating fabric binding strip. Press seams open and press strip in half lengthwise.


Trim edges.
Cut (2) 2-1/2 in. X 18 in. strips from rooster fabric.
Sub-cut each strip into a 6-1/2 in. strip and a 10-1/2 in. strip.
Sew short strips to sides of block and press seams toward strips.
Sew long strips to top and bottom and press seams toward strips.
Layer with batting and backing fabric and sew through all layers diagonally with white thread. Add a heat resistant fabric layer to the bottom if desired and trim the edges.
Sew binding to edges following instructions for first potholder.

Saturday, February 25, 2012

Ink Techniques: StazOn Ink

Coloured Image
StazOn is a solvent-based permanent ink that doesn't bleed, so it's perfect for outline images that will be coloured.

I stamped the image with Jet Black StazOn. Once dry, I used Stampin' Up! markers to colour the flowers and leaves. Just fill in the flowers with a So Saffron marker and go over the shaded areas with a Daffodil Delight marker. For the leaves I used a Certainly Celery marker and applied it again over the shading to intensify the colour. So quick!

Supplies
Stamps
-Apothecary Art 125525
Ink
-Jet Black StazOn ink 101406
-So Saffron marker 105114
-Daffodil Delight marker 119677
-Certainly Celery marker 105165
Paper
-So Saffron card stock 105118
-Very Vanilla card stock 101650
Tools
-Big Shot 113439
-Label Collection Framelits Dies 125598
-Adorning Accents Edgelits Dies (set of 2) 125595
-Textured Impressions Embossing Folders (set of 3) 12560
Accessories
-Pear Pizzazz Seam Binding 122330

Stamped Fibre

Because it doesn't run, StazOn ink can be used to stamp on fibres. I used temporary snail adhesive to hold the ribbon to my work surface and stamped with Jet Black StazOn.

Supplies
Stamps
-Fabulous Phrases 117002
Ink
-Jet Black StazOn 101406
Paper
-Baja Breeze card stock 111352
-Island Indigo card stock 122923
-Very Vanilla card stock 101650
-Basic Black card stock 121045
-Fine Print Specialty paper 121878
-Mocha Morning Specialty paper 122366
-Subtles Patterns Designer paper 117152
Tools
-Big Shot 113439
-Perfect Polka Dots embossing folder 117335
-Fancy Flower punch 118073
-5-Petal Flower punch 119880
-Boho Blossoms punch 119858
Accessories
-Hemp twine 100982
-Linen thread 104199
-Basic Rhinestones 119246
-Baja Breeze Seam Binding 122331
-1-1/4 in. Striped Grosgrain ribbon 115615

Wednesday, February 8, 2012

Ink Techniques: Re-inker Dye

Natural fibres can be dyed with Stampin' Up! re-inkers. Try dying paper and fabric flowers, baker's twine and ribbon. Natural fibres are best, but some synthetics will work. Just remember the dye will bleed if it gets wet.

The flowers and ribbon on this card were dyed with Stampin' Up! ink.

Dyed Paper Flowers
Place a paper flower on a plastic surface. I used a page protector. Spray it with water until wet.
Spray water on the plastic and add drops of re-inker. Spray with water to make the dye run together a little.
 Gently place the wet flower onto the dye to soak up the colours. Be careful! The paper is very fragile when wet.
 Move the flower to a dry surface and remove excess dye with a wet wipe. Let dry completely.

For paler colour add a few drops of re-inker to a small container of water and submerge the flower.

You can use a heat tool to dry the flowers, but be careful not to burn them!


Cut the flower in half.
Curl the side petal and roll the flower.
Place a dot of glue on the last petal and fold it over.


Cut 2 petals from the large green dyed flower. Place a dot of glue at the base of each leaf and fold them over the base of the flower.

 Let the glue dry.
Curl the petals and leaves back to form the flower.


Dyed Ribbon
Spray water on ribbon until wet. Hold the ribbon against the surface of an ink pad with your bone folder. Pull the ribbon to apply ink to one side.
Hold the ribbon against the surface of another ink pad with your bone folder and pull to dye the other side.


Hold the ribbon against your work surface with your bone folder and pull the ribbon to blend the colours in the middle. Let ribbon dry.

Don't use a heat tool to dry the ribbon if it's made from synthetic fibres or it will melt.


Supplies
Stamps
-Elements of Style 118611
-Loving Thoughts 125843
Ink
-River Rock ink pad 109010
-Perfect Plum ink pad 101437
-Pretty in Pink ink pad 101301
-Pink Pirouette ink refill 111843
-Perfect Plum ink refill 102107
-Certainly Celery ink refill 105230
-Pear Pizzazz ink refill 119674
Paper
-River Rock card stock 108640
-Pink Pirouette card stock 111351
-Very Vanilla card stock 101650
Tools
-Big Shot 113439
-Labels Collection Framelits 125598
-Oval Frame Embossing Folder 123130
-Lace Ribbon Border punch 122362
-Bone Folder 102300
-water spray bottle
Accessories
-Whisper White Taffeta ribbon 109070
-Paper Daisies 119243

Dyed Glimmer Paper
Colour Silver Glimmer Paper with Stampin' Up! ink and sponge daubers like the hearts on this card.


Add some drops of Tempting Turquoise ink from a refill bottle to the inside of the ink pad lid. Soak up ink on a sponge dauber and press the ink onto the punched Glimmer Paper heart. Let dry thoroughly.


Apply Melon Mambo ink to the other punched Glimmer Paper heart and let dry.


Supplies
Stamps
-A Word for You 117032
Ink
-Tempting Turquoise ink refill 111840
-Melon Mambo ink refill 115662
-Baja Breeze ink pad 111833
Paper
-Baja Breeze card stock 111352
-Pink Pirouette card stock 111351
-Whisper White card stock 100730
-Silver Glimmer Paper
Tools
-Big Shot 113439
-Hearts Embossing Folders (set of 3) 125601
-Sponge Daubers 102892
-Heart to Heart punch 119881
Accessories
-Baja Breeze 1/8 in. Taffeta ribbon 122964

Tuesday, January 24, 2012

Flower Quilt

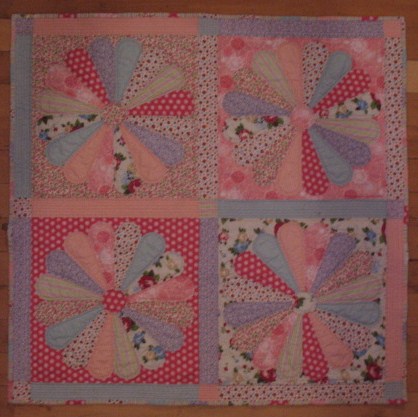
I used the new Delft Designs die for the Big Shot to cut and paper piece the flowers on this quilt. The Stampin' Up! fabrics are called, Twitterpated, Springtime Vintage and Flirtatious. They are 18 X 28 in. fat quarters.
You'll also need batting and 1.10 m. of backing fabric.


Instructions
From cardboard (I used a file folder) cut patterns of both Delft Designs petals and circles with the 2-1/2 in. and 3 in. circle dies and the Big Shot.

Draw a line down the centre of the large petal pattern.
Careful cutting of the Twitterpated striped fabric is important if you want to use it for every other square in the binding as I have done. Or, you can use equal amounts of all 9 fabrics. You'll also need 8 petals.

Trim the smallest amount of fabric from one side to straighten the edge, then cut six 2-1/2 in. X 18 in. strips. Sub-cut each strip into 5-1/2 in. and 12-1/2 in. sections for the binding.
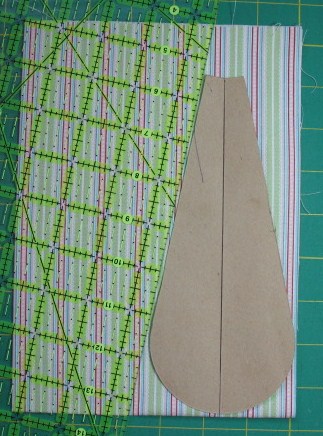
Fold the remaining fabric into quarters and place the large petal pattern next to the cut edges with the wide end close to the fold.
Lay a straight edge close to the side of the pattern.

Use a rotary blade to cut through all 4 layers of fabric.

Position the fabric on the die with the diagonal edge along the side of the large petal and cut out 4 petals at once with the Big Shot.


Place the pattern close to the diagonal cut edge of the remaining fabric and use the rotary blade to cut beside the other side of the pattern.


Position all 4 layers on the die and cut out 4 petals with the Big Shot.
Open the last piece of fabric and fold along the length only. Place straight edge 1-1/4 in. from the fold and cut.


Open the strip and cut off the ends, leaving a 2-1/2 in. X 8 in. strip. Sub-cut a 2-1/2 in. square for the centre of the the sashing and save the 2-1/2 in. X 5-1/2 in. section for the binding.

Choose 4 fabrics for the blocks and cut an 18 in. square from each. You will also need 6 petals of each fabric.
The strips for the binding will be cut from the blocks after the flowers are appliqued.
Fold each the remaining fabrics into quarters and position the large petal pattern next to the cut edges in a corner.
Place the straight edge close to the side of the petal.
Cut through 4 layers with a rotary blade.
Position the fabric on the die and cut 4 petals with the Big Shot.
Place the fold of the remaining doubled fabric on the die in the centre of the large petal.
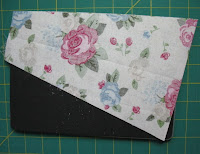


Open the fabric and cut 2 petals with the Big Shot.
Choose 4 fabrics for the sashing strips and squares. Cut four 2-1/2 in. X 18 in. strips from each fabric. From 1 strip of each fabric cut two 2-1/2 in. squares. Save the remaining 2-1/2 in. X 13 in. strip for the binding.

Cut 8 large flower petals from each fabric.
Sew a running stitch around each petal 1/8 in. from the edge.

Position the small petal pattern on the fabric petal and pull up the thread. The edges will curve over the pattern.
Press the seam allowance and remove the pattern.
Hold two petals together and take tiny stitches through the pressed edge ending before the curve of the petals.
Sew 16 petals together and pin to a block. Notice that the flower won't include any of the block fabric.
Sew the outer edge of the flower to the block by hand or machine.
 Turn the block over and trim the fabric from behind the flower leaving a 1/4 in. seam allowance. Save the block fabric for binding strips and flower centres.
Cut two 2-1/2 in. X 5-1/2 in. strips for binding.
 Cut 3 in. circle from scrap for flower centre.
 Sew a running stitch around circle. Position 2-1/2 in. circle pattern piece on fabric circle and pull up thread. Press the edge and remove the pattern piece.

Pin the circle to the flower centre and sew close to the edge by hand or machine.


Use a scant 1/4 in. seam allowance to piece the quilt top.
For sashing sew squares and strips to make left, middle and right narrow sections. Press the seams towards the small squares.
Sew leftover strips to blocks and press seams toward the blocks.
Join the sashing and block sections pressing the seams toward the blocks.
Place right side down and tape edges to work surface with masking tape keeping the fabric square. Cover with batting and backing fabric and pin through all layers.
Quilt as desired. I sewed rows spaced 1/4 in. apart on the sashing, creating a grid on the small squares. Then 1/4 in. inside and outside the flower centres.  Finally, 1/4 in. inside each petal and 1/4 in. outside the flower outline.
For the binding sew 12-1/2 in. strips together using striped fabric between each print. Sew 5-1/2 in. strips together in the same way. Press seams open and cut these into 2-1/2 in. sections. Sew the sections together into a continuous strip. Fold and press length. Sew around trimmed edges of quilt using a 3/8 in. seam allowance, with mitred corners. Hand sew folded edge to back of quilt.

Supplies
Twitterpated fabric 125412
Flirtatious fabric 122335
Springtime Vintage fabric 121817
Big Shot 113439
Dresden Designs die 125597