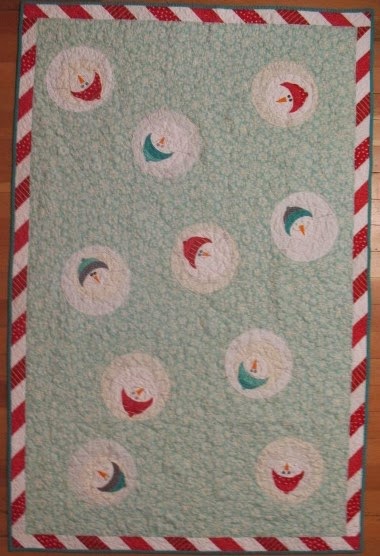
The Big Shot is a useful tool for both of my favourite hobbies; sewing and paper crafts. I used framelits and the Big Shot to make the patterns for the Snowmen on my Lap Quilt.
Choose Fabrics (from left)
-1 grey and aqua print for hats (scrap)
-1 aqua print for hats (scrap)
-1 aqua print for hats and binding (0.50 m.)
-1 light aqua snowflake fabric for background (2.00 m.)
-3 red prints for hats and sashing (0.20 m.)
-1 white print on pale aqua background for snowmen (0.30 m.)
-3 white on white prints or pale print on white for snowmen and sashing (0.50 m.)
-backing fabric (2.70 m.)
-batting (1.50 m. X 1.90 m.)
Snowman Pattern
-use a compass to make circle patterns or trace a household item
(I traced a cheesecake pan for the 9 in. circle and a cereal bowl for the 6-1/2 in. circle. I used a Big Shot framelit to cut the 3-5/8 in. circle.)
-cut 3 large circles and 3 medium circles from the white print on pale aqua
-cut 3 large circles and 3 medium circles from the pale print on white
-cut 2 large circles, 2 medium circles and 5 small circles from each of the white on white prints
-arrange the large circles on the background fabric and sew 1/4 in. from the raw edge
-stack medium circles on the large circles and sew 1/4 in. from raw edge
-stack small circles on medium circles and sew 1/4 in. from raw edge
(I left the edges of the snowmen unfinished so they would fray)

Hat Pattern
-cut half circles using 3-1/4 in. framelits with the Big Shot or trace the framelit and cut with scissors
-cut smallest circles with the Big Shot or trace the framelit and cut with scissors

-cut card stock oval with framelit using the Big Shot
-position framelit over oval and cut hat brim pattern
-trace the pattern on fabric and cut with scissors

-stack hat pieces and position on the snowmen heads
-sew around edges with close zigzag stitch starting with pom-pom

-use circle and oval framelits as templates for mouths
-trace curve with a Frixion pen (the ink disappears with heat)

-zigzag mouth over marking
-zigzag arms
(I used grey thread for the mouths and arms)
-cut triangles of a scrap of orange fabric for noses
-zigzag noses to face

-pull zigzag threads through fabric to wrong side
-thread ends into needle and anchor under stitching
-trim ends of threads

-sew red and white strips together using a scant 1/4 in. seam and staggering the ends by 2-1/2 in.
-press the seams toward the red strips
-sew 2 sets of 4 strips and 1 set of 2 strips

-use a quilting ruler to cut 2-1/2 in. wide strips at a 45 degree angle
-sew strips together into a long sashing strip
-sew sashing to long sides of quilt top
-sew sashing to short sides of quilt top
-layer quilt top, batting and backing fabric
-pin through layers
-quilt layers together (I sewed simple snowflakes of over-lapping x's with white thread)
-cut 2-1/2 in. binding strips from aqua print and sew into long strip
-fold in half lengthwise and press
-sew to edges of quilt (
see detailed tutorial)
-sew button eyes to snowmen (I used Stampin' Up! buttons)
Stampin' Up! Supplies
-Big Shot 113439
-Circles Collection framelits 130911
-Ovals Collection framelits 129381
-Neutrals buttons 130031 (Basic Black and Smoky Slate)
-Brights buttons 130028 (Bermuda Bay)
-Regals buttons 130029 (Island Indigo)
-Subtles buttons 130030 (Pool Party)
 Too Kind is a versatile stamp set for creating layered flowers. I layered the simple floral top mat over a background mat made with the larger floral stamped in a unique way learned from my Stampin' Sistah Suzanne Nelson.
 -stamp the large floral first step image

 -stamp the large floral second step image over the first images overlapping them too