Friday, December 7, 2012

Crazy Quilt Stocking

I used those odd-sized scraps of lace and fabric from my other projects to make crazy quilt stocking ornaments.

The top of this one is embellished with pleated and knotted seam binding. I used Early Espresso and Whisper White Baker's twine (123124) to make the tassel.

Try making my No-Sew ribbon flower to embellish your projects.

Use Baker's twine to crochet that sweet heart from Leigha Rock's wonderful blog.


-trace the outline of the stocking on thin cotton backing fabric
-pin a piece of fabric somewhere in the middle
-cover an edge with another piece of fabric
-sew a 1/4 in. seam
-finger press the fabric over the seam and trim threads
-trim away fabric to make a straight edge for the next piece of fabric
-cover an edge and sew a 1/4 in. seam
-finger press fabric over the seam
-continue adding fabrics until the outline is covered
-trace around the stocking pattern on the wrong side
-layer the crazy quilt piece over lining fabric
-leaving the top open, stitch around the traced line back-stitching at the beginning and end

-cut off the top on the traced line
-trim around the stitching with pinking shears
-turn right side out
-turn over 1/4 in. on top edge and hem
-embellish as desired


Tuesday, December 4, 2012

Fabric Tree Ornaments

These fabric covered ornaments are much faster to make than the ribbon ornaments in my previous post.

I used my Big Shot die cutting machine and the 3 in. and 3-1/2 in. circle dies to cut 2 fabric circles. Follow the directions below to cover a styrofoam ball, then cover the stitching and make a hanging loop with ribbon.

For the gold organza ball, I covered the stitching with 2 rows of 1/4 in. wide Sticky Strip (104294) and rolled it in Champagne Glass Glitter (120997). Use a long needle to bring the ends of a length of Baker's twine through the ball from the bottom to the top. Cover the stitch on the bottom with a circle of Sticky Page and press it into glitter, then insert a Basics Glimmer brad (121003). Use the ends of the twine at the top to tie the ribbon loop and bow in place.

-cut the fabric with the 3-1/2 circle die and the Big Shot (I trimmed 1/8 in. for the size of ball I had)
-fold the circle in half and mark the fold with pins
-open the circle and fold again with pins together
-mark the fold with pins
-open the circle and fold again with pins together
-mark the fold with pins
-open the circle and fold again until 8 pins mark the edge
-mark the ball and measure around the middle
-mark the ball into quarters
-match the quarter marks of the fabric circle and the ball and pin in place
-pin the remaining pin markings of the fabric to the ball
-pin the second circle to the ball in the same way
-stitch the edges of the fabric together so that they just meet to reduce bulk
-the ball looks like this
-measure a length of ribbon to go around the ball and form a loop with a bow
-hold ribbon in place with pins and sew it to the ball to hide the stitching around the middle
-form a loop and tie a bow to secure it


Sunday, December 2, 2012

Ribbon Tree Ornaments

These tree ornaments are made with Stampin' Up! ribbons pinned to styrofoam balls.

Use short steel head pins.

I used Ribbon Widths (RW) to measure the length of ribbon needed.
If 5/8 in. wide ribbon is used, then 4RW will be 2-1/2 in. long. (That's 5/8 X 4 = 2-1/2)

-cut 4 strips of ribbon, 4RW long
-push a pin through the middle of the ribbon strip about 1/16" from the edge
-push the pin into the styrofoam ball (mine had a line like the equator)
-fold the ends of the ribbon back forming a point and hold in place with more pins
-if the pinhead isn't hidden then place the pin farther from the edge of the ribbon
-place all 4 strips of ribbon adjusting as needed to cover the ball
-cut 8 strips of ribbon, 4 RW long for the next row
-pin 4 strips over the bias joins of the previous row first, then pin 4 strips between them
-continue placing ribbons over the previous ribbons until half the ball is covered
-remove pins holding the ends NOT the points as you go
-turn the ball over and place a pin in the centre along the equator
-cover this side of the ball the same as the first side
-stitch through all layers of ribbon around the ball to hold them in place
-trim ribbon ends
-remove any unnecessary pins
-tie a ribbon around the ball to hide the stitching and make a hanging loop


Sunday, November 25, 2012

VersaMark Techniques: Heat and Stick Glitter

VersaMark is a thick, clear medium with many uses. Stampin' Up! offers it in a pad and a refill bottle. You can also find it elsewhere in a marker, but I squeezed some from the bottle and used a dried-up blender pen to apply it to my image. I found I could apply it thicker and increase the open time, too.

Heat and Stick powder adheres to VersaMark. Then, when it's heated you can cover it with glitter and heat emboss again to hold the glitter.

-stamp the image and swipe it with an Embossing Buddy
 -squeeze some VersaMark into a lid and apply to the image with a dried-up blender pen
-pour Heat and Stick powder over the image and shake off the excess
-use your Heat Tool to melt the powder
-pour Dazzling Diamonds glitter over the image and shake off the excess
-use a small paint brush to remove any stray glitter
-use your Heat Tool to melt the powder again to hold the glitter


Supplies
Stamps
-Christmas Lodge 123767
Ink
-Marina Mist pad 126962
-VersaMark Ink refill 102193
Paper
-Whisper White card stock 100730
-Bashful Blue card stock 105120
-Marina Mist card stock 119682
Tools
-Big Shot 113439
-Labels Collection Framelits 125598
-Northern Flurry embossing folder 120902
-1/2 in. Circle punch 119869
-Embossing Buddy 103083
-Blender pen 102845
-Heat Tool 129053
Accessories
-Heat and Stick powder 100625
-Dazzling Diamonds glitter 102023

Friday, November 23, 2012

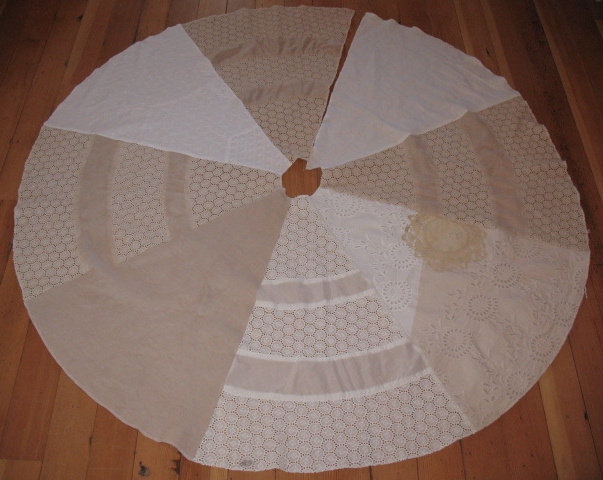
Not Quite White Christmas Tree Skirt

I love all things Vintage! Crazy quilts, ribbons, lace, embroidery, all make me a little dreamy. So, I decided to use them in a neutral theme to decorate my daughter's house for Christmas this year.

I used trims from Stampin' Up! as well as fabrics and lace from my stash and my local Value Village. So,  use the instructions for my Tree Skirt as a guide.
At the Thrift Store I found 3 embroidered cotton skirts, 2 linen skirts and lots of crocheted doilies. At home I washed and dried them all before cutting the skirts apart along the seams. All my skirts were lined with a lightweight cotton which is useful for backing fabric.


After sorting the pieces I brewed-up a large pot of strong tea. (5 Red Rose teabags in about 3 gallons of water, boiled for 5 minutes.) Submerge and stir the fabric in the tea until it is twice as dark as you'd like. Vary the intensity by leaving some pieces longer than others. Some of mine only stayed in the tea for 15 minutes, some for 2 hours. Wash and dry the fabrics again.
I made a pattern by folding a square of packing paper several times until I had a narrow wedge shape. Cut off 2 in. from the point and 2 feet from the the first cut. Press the paper with a dry iron to flatten it. I used half of the square so I needed to cut 8 sections for a circle tree skirt.
I cut my pattern from the larger fabric pieces first. I got 4 lace sections and 2 linen sections.


Leave 1/4 in. seam allowances at the sides.


When there were no more pieces of fabric large enough for a section, I cut the pattern from lightweight cotton lining. I folded my pattern in half and placed it on the fold. Then I sewed fabric pieces to the backing overlapping the edges and trimming as needed.
I made 2 pieced sections.


I sewed the 8 sections together leaving an opening.


Consider each section and embellish it.
I sewed rows of Victoria Crochet trim (118481) and Very Vanilla 1/8 in. Taffeta ribbon (119960) to the plain cotton inserts in this section.


To this plain linen section, I sewed a heart shaped doily found at a craft store and embellished it with a flower and ribbons.


Ribbon Flower
-cut 18 in. of Crumb Cake Scalloped Tulle ribbon (127840)
-fold lengthwise and sew a running stitch and gather into a circle
-sew to the Tree Skirt
-make 5 long stitches forming spokes over the centre of the tulle ruffle
-thread a tapestry needle with Crumb Cake seam binding (122332)
-weave the seam binding through the thread spokes, twisting and shaping the petals
-tie knots in a 40 in. length of Whisper White 3/8 in. Taffeta ribbon (109070)
-arrange the ribbon and stitch the knots to the Tree Skirt
I cut the corners and edging from a large eyelet doily and sewed them to this section. Then, I tied knots in 3/8 in. Crumb Cake Taffeta ribbon (122966) and tacked it down.
The large lace fabric pieces were sewed to a thin cotton backing section. I covered the raw edges where the fabrics joined with thrift store doilies and added a woven ribbon heart surrounded with Neutrals Designer buttons (119743).
I used the 3-1/2 in. circle die and my Big Shot to cut circles from tea-dyed fabrics and made a bunch of yoyos to embellish a section.
On this plain linen section I sewed an eyelet doily from the thrift store and added some ribbon flowers.
The large rose was made from Crumb Cake Scalloped Tulle ribbon (127840) loosely coiled and stitched.
The No-Sew 3/8 in. Taffeta ribbon flowers are my own invention. But, you'll have to sew them to the doily.

Here's a close-up of the flowers.
This section was difficult to embellish because I sewed odd-shaped pieces of lace a bit haphazardly on a thin cotton backing. Eventually I came up with the a criss-crossed Crumb Cake taffeta ribbon (122966) design to cover the joined edges of the lace. The doilies also cover some seams. I coiled 7/8 in. Cotton ribbon (127844) to make the flower.
I sewed Soft Suede taffeta ribbon (122967) to this section to look a little like a fan and added lace cut from a thrift store doily.

After embellishing the sections I hemmed the opening edges and sewed lace to the outer edge and the centre.