Here's another version of the stocking tree ornaments I'm working on.
The lace is a piece of a doily from the thrift store. I made the tassel with 3 lengths of Baker's Twine (124262) and adhered half pearls (119247) together over the twine. Add a jumbo half pearl (125577) to a large Vintage Faceted Designer button (127555) and sew small ones to the top.
Friday, November 16, 2012
Tuesday, November 6, 2012
Wheel Techniques: Builder Wheels
Builders wheels are so versatile! Choose 1, 2 or 3 wheels and use them together in a jumbo handle. There's even a three-colour cartridge you can ink so that each wheel is a different colour!
I used 2 builder wheels on the spindle with a spacer to make this card. Adding rows of paper lace and ribbon between the rolled images reminded me of heirloom sewing, so I came up with a No-Sew ribbon flower.
-determine the direction of the image
-slide a builder wheel and spacer onto the spindle
-slide the second builder wheel and end cap onto the spindle
-click the spindle into a jumbo handle
-swipe the card front with an embossing buddy
-ink the wheels on a VersaMark pad
-roll the wheels across the card front next to the crease
-ink the wheels again and roll across the card front next to the bottom edge
-cover with embossing powder, shake off excess and heat with heat tool
Ribbon Flower
-cut a 12 in. length of Perfect Plum 3/8 in. Taffeta ribbon
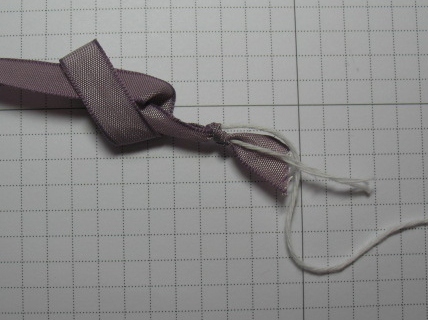
-form a loose overhand knot near the end
-cut an 8 in. length of Baker's twine
-thread the twine through the loose knot
-tighten the knot close to the end of the ribbon
-form another loose overhand knot
-thread the twine through the knot
-tighten the knot keeping 1-1/2 in. between the knots
-make a total of 5 knots in the ribbon
-push the knots together along the twine
-tie the twine in a square knot (that's right over left, left over right)
-arrange the knots into a circle
-turn the ribbon over
-fold the long end of the ribbon over to form the last petal
-tie a square knot over the loop
-trim the ribbon and twine ends
-tie an overhand knot in a piece of So Saffron 3/8 in. Taffeta ribbon
-push the knot up through the centre of the flower
-grasp the side of a petal loop and fold over to the back
-apply glue dots to the back of the flower and adhere it to the card front
Supplies
Stamps
-Gossamer Lace 129050
-Thoughtful Friend Builder Wheel 118616
-Viola's Lace Builder Wheel 126936
Ink
-VersaMark pad 102283
Paper
-So Saffron card stock 105118
-Whisper White card stock 100730
-Vellum card stock 101856
Tools
-Big Shot 113439
-Finishing Touches edgelits 127010
-Delicate Doilies sizzlits 126999
-Scallop Trim Border punch 118402
Accessories
-Whisper White 3/8 in. Taffeta ribbon 109070
-Perfect Plum 3/8 in. Taffeta ribbon 122987
-So Saffron 3/8 in. Taffeta ribbon 122982
-Certainly Celery 3/8 in. Taffeta ribbon 119963
-Very Vanilla 1/8 in. Taffeta ribbon 119960
-Whisper White 5/5 in. Organza ribbon 114319
-Baker's twine 124262
-Embossing Buddy 103083
-Heat Tool 129053
-White embossing powder 109132
-glue dots 103683
I used 2 builder wheels on the spindle with a spacer to make this card. Adding rows of paper lace and ribbon between the rolled images reminded me of heirloom sewing, so I came up with a No-Sew ribbon flower.
-determine the direction of the image
-slide a builder wheel and spacer onto the spindle
-slide the second builder wheel and end cap onto the spindle
-click the spindle into a jumbo handle
-swipe the card front with an embossing buddy
-ink the wheels on a VersaMark pad
-roll the wheels across the card front next to the crease
-ink the wheels again and roll across the card front next to the bottom edge
-cover with embossing powder, shake off excess and heat with heat tool
Ribbon Flower
-cut a 12 in. length of Perfect Plum 3/8 in. Taffeta ribbon
-form a loose overhand knot near the end
-cut an 8 in. length of Baker's twine
-thread the twine through the loose knot
-tighten the knot close to the end of the ribbon
-form another loose overhand knot
-thread the twine through the knot
-tighten the knot keeping 1-1/2 in. between the knots
-make a total of 5 knots in the ribbon
-push the knots together along the twine
-tie the twine in a square knot (that's right over left, left over right)
-arrange the knots into a circle
-turn the ribbon over
-fold the long end of the ribbon over to form the last petal
-tie a square knot over the loop
-trim the ribbon and twine ends
-tie an overhand knot in a piece of So Saffron 3/8 in. Taffeta ribbon
-push the knot up through the centre of the flower
-grasp the side of a petal loop and fold over to the back
-apply glue dots to the back of the flower and adhere it to the card front
Supplies
Stamps
-Gossamer Lace 129050
-Thoughtful Friend Builder Wheel 118616
-Viola's Lace Builder Wheel 126936
Ink
-VersaMark pad 102283
Paper
-So Saffron card stock 105118
-Whisper White card stock 100730
-Vellum card stock 101856
Tools
-Big Shot 113439
-Finishing Touches edgelits 127010
-Delicate Doilies sizzlits 126999
-Scallop Trim Border punch 118402
Accessories
-Whisper White 3/8 in. Taffeta ribbon 109070
-Perfect Plum 3/8 in. Taffeta ribbon 122987
-So Saffron 3/8 in. Taffeta ribbon 122982
-Certainly Celery 3/8 in. Taffeta ribbon 119963
-Very Vanilla 1/8 in. Taffeta ribbon 119960
-Whisper White 5/5 in. Organza ribbon 114319
-Baker's twine 124262
-Embossing Buddy 103083
-Heat Tool 129053
-White embossing powder 109132
-glue dots 103683
Sunday, November 4, 2012
Ribbon Stocking Ornament
This year I'm decorating my daughter Grace's house for Christmas and I'll be posting tutorials for you to use for your own hand-made decorations.
This small (7 in.) stocking is perfect for filling with candy and hanging on the tree.
I used a button with a yoyo to embellish the hanger loop.
I cut fabric adhesive with a heart framelit and my Big Shot, stuck it on some tea-dyed linen and cut out the fabric. Next, I fused the heart to the stocking and used adhesive pearls to outline it. Larger adhesive pearls were used on the pleated lace trim, too.
This small (7 in.) stocking is perfect for filling with candy and hanging on the tree.
I used a button with a yoyo to embellish the hanger loop.
I cut fabric adhesive with a heart framelit and my Big Shot, stuck it on some tea-dyed linen and cut out the fabric. Next, I fused the heart to the stocking and used adhesive pearls to outline it. Larger adhesive pearls were used on the pleated lace trim, too.
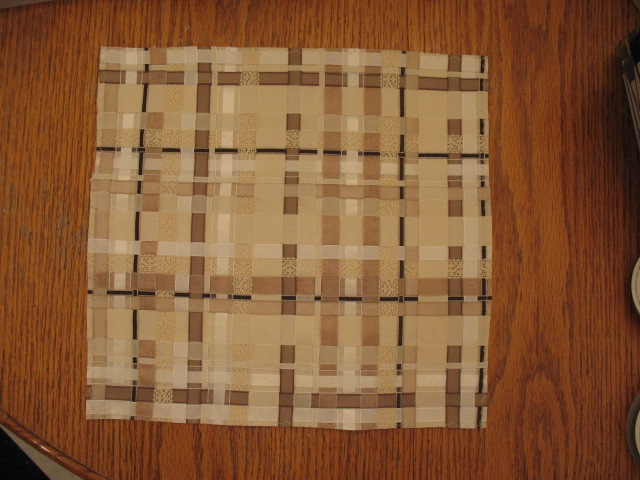
Ribbon Weaving
-cut 12 in. lengths of various ribbons and lace
-pin both ends to a cork board to form a 12 in. square
-weave ribbons through the lengths pinned to the board, pinning the ends
-this is the wrong side
-cut a square of fabric adhesive like Steam-A-Seam and adhere it to the finished weaving
-peel away the backing
-cover the adhesive with a lightweight cotton backing fabric
-remove the pins and transfer the layers to an ironing board
-cover with a press cloth and steam the fabric to fuse it to the ribbon
-trim the edges
Stocking Ornament
-to make the stocking pattern, cut the Holiday Stocking die from paper
-lap the band piece over the stocking piece on thick cardboard and trace the outline
-cut around the pattern trimming as desired
-place fabrics right sides together
-trace around the cardboard pattern with a pencil or disappearing marker
-sew on the traced line, leaving the top open and back-stitching at the beginning and end
-cut on the traced line across the top
-use pinking shears to trim around the stitching or trim 1/4 in. from stitching and cut notches for turning
-turn right side out
-turn top edge over to right side and sew trim around opening (I box-pleated some crochet trim)
-embellish as desired (see detail photos at top)
Supplies
-Crumb Cake 1/2 in. Seam Binding 122332
-Very Vanilla 1/2 in. Seam Binding 120999
-Early Espresso 1/8 in. Taffeta ribbon 19959
-Very Vanilla 1/8 in. Taffeta ribbon 119960
-Crumb Cake 3/8 in. Taffeta ribbon 122966
-Soft Suede 3/8 in. Taffeta ribbon 122967
-Whisper White 3/8 in. Taffeta ribbon 109070
-Victoria 5/8 in. Crochet trim 118481
-Whisper White 5/8 in. Organza ribbon 114319
-Natural 7/8 in. Cotton ribbon 127844
-Pearl Basic Jewels 119247
-Neutrals Designer buttons 119743
-Big Shot 113439
-Hearts Collection Framelits 125599
-3-1/2 in. Circle die 121811
-cut 12 in. lengths of various ribbons and lace
-pin both ends to a cork board to form a 12 in. square
-weave ribbons through the lengths pinned to the board, pinning the ends
-this is the wrong side
-cut a square of fabric adhesive like Steam-A-Seam and adhere it to the finished weaving
-peel away the backing
-cover the adhesive with a lightweight cotton backing fabric
-remove the pins and transfer the layers to an ironing board
-cover with a press cloth and steam the fabric to fuse it to the ribbon
-trim the edges
Stocking Ornament
-lap the band piece over the stocking piece on thick cardboard and trace the outline
-cut around the pattern trimming as desired
-place fabrics right sides together
-trace around the cardboard pattern with a pencil or disappearing marker
-sew on the traced line, leaving the top open and back-stitching at the beginning and end
-cut on the traced line across the top
-use pinking shears to trim around the stitching or trim 1/4 in. from stitching and cut notches for turning
-turn right side out
-turn top edge over to right side and sew trim around opening (I box-pleated some crochet trim)
-embellish as desired (see detail photos at top)
Supplies
-Crumb Cake 1/2 in. Seam Binding 122332
-Very Vanilla 1/2 in. Seam Binding 120999
-Early Espresso 1/8 in. Taffeta ribbon 19959
-Very Vanilla 1/8 in. Taffeta ribbon 119960
-Crumb Cake 3/8 in. Taffeta ribbon 122966
-Soft Suede 3/8 in. Taffeta ribbon 122967
-Whisper White 3/8 in. Taffeta ribbon 109070
-Victoria 5/8 in. Crochet trim 118481
-Whisper White 5/8 in. Organza ribbon 114319
-Natural 7/8 in. Cotton ribbon 127844
-Pearl Basic Jewels 119247
-Neutrals Designer buttons 119743
-Big Shot 113439
-Hearts Collection Framelits 125599
-3-1/2 in. Circle die 121811
Tuesday, October 30, 2012
Wheel Techniques: Marker Detail
-colour a detail
-wheel on card stock
-stamp the butterfly and add ink to the edges with a sponge dauber
Supplies
Stamps
-Very Vintage jumbo wheel 117693
-Papillon Potpourri 123757
-Tiny Tags 118091
-Lovely Little Labels 126260
-Four Frames 123440
Ink
-River Rock ink pad 126974
-Always Artichoke ink pad 126972
-Marina Mist ink pad 126962
-Marina Mist marker 119679
Paper
-River Rock card stock 108640
-Always Artichoke card stock 105119
-Baja Breeze card stock 111352
-Naturals Ivory card stock 101849
Tools
-Decorative Label punch 120907
-Jewelry Tag punch 117190
-Elegant Butterfly punch 127526
-Postage Stamp punch 122344
Accessories
-Linen thread 104199
-7/8 in. Cotton ribbon 127844
-Vintage Trinkets 118764
Sunday, October 14, 2012
Wheel Techniques: Backgrounds
Position the Music Notes wheel 120327 so that the notes will be right side up.
Press the handle 102971 onto the axle of the wheel until it snaps into place.
Ink the wheel on the Early Espresso ink pad 119686. Don't roll it back on forth, but roll to the end, lift and repeat until it is evenly inked all around.
I use a thick straight edge wheel guide for making straight lines. Wheel the image on Very Vanilla card stock 101650 keeping it flat against the surface. Ink the wheel again and make another row.
Use the Big Shot 113439 and the Manhattan Flower embossing folder 114517 to emboss Brushed Gold card stock 102935.
Cut out the shaped edge of the flowers. Adhere over the wheeled background mat.
Tie Cherry Cobbler seam binding 120992 in a bow around a closed ink pad. Cut the back and adhere the ends behind the wheeled mat.
Adhere the Cherry Cobbler card stock 119685 mat underneath.
Apply Champagne Shimmer paint 116806 with a Sponge Dauber 102892 to the edges of the Always Artichoke card stock 105119 card front.
Adhere the mats to the card front.
Use an Early Espresso ink refill 119789 to apply ink to Stampin' Around wheel cartridge 101529.
Insert the cartridge all the way into the handle.
Secure the wheel into the handle and push the cartridge up to contact the wheel.
Follow these links to see some other cards made with wheels.
http://cherylcanstamp.blogspot.ca/2012/08/piercing-techniques-templates.html
http://cherylcanstamp.blogspot.ca/2011/06/ink-techniques-stencil.html
Subscribe to:
Posts (Atom)