
A crimper isn't absolutely necessary for this technique, but it sure makes it faster and easier! The soft, fuzzy texture is actually the inside of the card stock!
The card stock has to be distressed so much that the fibres are broken and the layers begin to separate. That's where the crimper comes in. If you run your card stock shape through the crimper LOTS of times in different directions before crumpling you won't get tears on the edges and the layers will peel apart uniformly.
I usually punch or cut out my card stock before
distressing because once it's softened the punches may jam.

The lamb's body is a scallop circle and the head piece is made by inserting another scallop circle back into the punch and punching out a smaller section.
Distress both pieces by crimping them over and over and in different directions. Crumple the pieces in your hand until the edges start to separate.

Peel the pieces apart.
For the Chocolate Chip card stock pieces punch:
legs = Word Window X 2
face = Small Oval X 1
ears = Boho Blossoms 6 petal flower X 2, then cut off 2 petals on each side
Supplies
Stamps
-Short and Sweet 115060 IBC p. 148
Ink IBC pp. 165-169
-Perfect Plum ink pad
-Chocolate Chip ink pad
Paper IBC pp. 165-170
-Naturals White card stock
-Chocolate Chip card stock
-Pretty in Pink card stock
-Perfect Plum card stock
-Pink Pirouette card stock
-Whisper White card stock
Tools
-Scallop Circle punch 119854 IBC p. 201
-Small Oval punch 119863 IBC p. 203
-Word Window punch 119857 IBC p. 203
-Boho Blossoms punch 119858 IBC p. 200
-Crimper 101618 IBC p. 198
Accessories
-Pretty in Pink 1/8 in. Taffeta ribbon 119260 IBC p. 191
-Subtles Flower brads 119732 IBC p. 187
Textured Vintage Mat
Textured Vintage Mat

Note the tears in the floral stamped mat. It wasn't crimped before crumpling, so the edges tore.
Supplies
Stamps
-Because I Care (Hostess Set) IBC p. 11
-Silhouette Sentiments (Hostess Set) IBC p. 11
-En Francais IBC p. 109521
Ink IBC pp. 165-169
-Early Espresso ink pad 119670
-Crumb Cake ink pad 121030
-Blushing Bride ink pad 119786
-River Rock ink pad 109010
Paper IBC pp. 165-170
-Crumb Cake card stock
-Blushing Bride card stock
-Naturals Ivory card stock
-Early Espresso card stock
Tools
-Big Shot 113439 IBC p. 204
-Framed Tulips embossing folder 121809 OMC p. 28
-Sponge Daubers 102892 IBC p. 195
-Crimper 101618 IBC p. 198
-Jewelry Tag punch 117190 IBC p. 202
Accessories
-Sticky Strip 103294 IBC p. 197
-Victoria Crochet trim 118481 IBC p. 190
-Antique brads 117273 IBC p. 186
Layered Flower
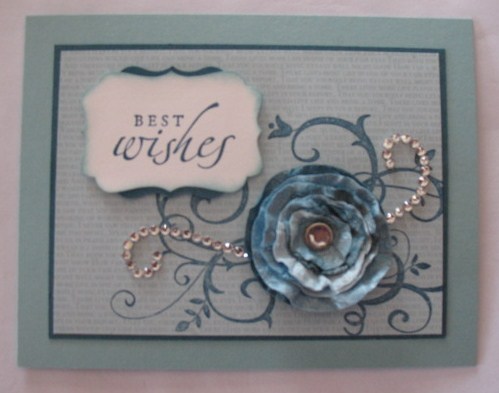

Stack the circles and insert the brad. Hold the prongs with one hand and crumple each circle, one at a time, around the brad.
My flower was sprayed with Smooch Spritz.
Supplies
Stamps
-Baroque Motifs 113490 IBC p. 132
-Sincere Salutations 115068 IBC p. 155
Ink IBC pp. 165-169
-Not Quite Navy ink pad 103008
-Baja Breeze ink pad 111833
Paper IBC pp. 165-170
-Baja Breeze card stock
-Not Quite Navy card stock
-Bashful Blue card stock
-Marina Mist card stock
-Baja Breeze DSP stack 117152
-Shimmery White card stock 101910
Tools
-1/16 in. hand punch 101227 IBC p. 202
-Decorative Label punch 120907 OMC p. 30
-Curly Label punch 119851 IBC p. 203
-3/4 in. Circle punch 119873 IBC p. 203
-1 in. Circle punch 119868 IBC p. 203
-1 1/4 in. Circle punch 119861 IBC p. 203
-1 3/8 in. Circle punch 119860 IBC p. 203
-1 3/4 in. Circle punch 119850 IBC p. 203
-Crimper 101618 IBC p. 198
-Sponge Dauber 102892 IBC p. 195
Accessories
-Basic Rhinestones 119246 IBC p. 188
-Clear Rhinestone brad 113144 IBC p. 187
-Vanilla Shimmer Smooch Spritz 118772 IBC p. 195


